Easy Japanese Tuna Onigiri Quick Recipe
15-min Easy Japanese Tuna Onigiri are about to become your new go-to snack or light meal. In today’s fast-paced world, who doesn’t crave delicious, satisfying food that doesn’t demand hours in the kitchen? That’s precisely where these delightful rice balls shine. People absolutely adore them for their simplicity, portability, and the comforting, familiar flavors they offer. Imagin extracte perfectly seasoned rice cradling a savory tuna filling, all wrapped up in a convenient, hand-held package. What makes 15-min Easy Japanese Tuna Onigiri so special is their incredible versatility; they’re a fantastic option for a quick lunch at your desk, a wholesome snack for the kids, or even a delightful addition to a picnic spread. We’ll show you just how achievable this culinary gem is.
Get Ready for Effortless Flavor!
Your Quick Culinary Adventure Awaits.
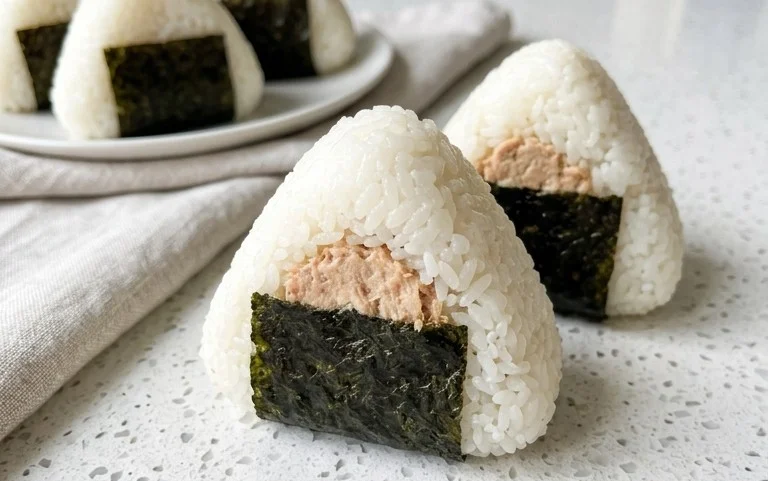
15-Min. Easy Japanese Tuna Onigiri
Craving a quick, satisfying, and deliciously authentic Japanese snack or light meal? Look no further than these incredibly easy 15-minute Japanese Tuna Onigiri! Onigiri, also known as rice balls, are a staple in Japanese cuisine, and this tuna mayo version is a classic for a reason. It’s incredibly versatile, portable, and requires minimal effort, making it perfect for busy weekdays, bento boxes, or even a satisfying snack any time of day. We’re talking about transforming simple ingredients into little flavor bombs in under 15 minutes, assuming you have cooked rice ready to go.
The beauty of onigiri lies in its simplicity and adaptability. While the classic tuna mayo is a crowd-pleaser, you can easily experiment with other fillings once you master this basic technique. But for now, let’s focus on getting these delightful rice balls into your hands quickly and efficiently. The combination of fluffy rice, savory tuna, creamy mayonnaise, and a hint of sesame, all wrapped in crisp nori, is simply irresistible. Get ready to impress yourself with how easy and delicious homemade onigiri can be!
Ingredients:
Instructions:
Prepare the Tuna Filling
First things first, let’s get our star filling ready. Open your can of tuna. If you’re using tuna packed in oil, drain it well by pressing the lid firmly against the tuna and tilting the can to let the oil drain out. If you’re using tuna packed in water, drain it just as thoroughly. The goal here is to remove as much liquid as possible to prevent your onigiri from becoming soggy. Once drained, transfer the tuna to a small bowl. Add the 2 tablespoons of Japanese mayonnaise (or your preferred regular mayonnaise). If you don’t have Japanese mayo, regular mayonnaise will work perfectly fine, though Japanese mayo offers a slightly richer and tangier flavor profile. Mix the tuna and mayonnaise together with a fork until well combined and creamy. You want a nice, cohesive mixture. If you like a little kick, you could even add a tiny pinch of black pepper here, though it’s not traditional. Set this bowl aside while we prepare the rice.
Season the Rice
Now for the rice! For the best onigiri texture and flavor, it’s crucial to use cooked short-grain rice. This type of rice has a sticky quality that holds together beautifully when formed into balls. If you’re using freshly cooked rice, make sure it’s still warm but not scalding hot – warm rice is easier to handle and shape. If you’re using leftover rice, gently reheat it until it’s warm. In a separate medium-sized bowl, place your 2 cups of cooked short-grain rice. Sprinkle the 1/2 teaspoon of salt evenly over the warm rice. The salt not only adds flavor but also helps to enhance the natural sweetness of the rice. Gently mix the salt into the rice using a rice paddle or a spoon. Be careful not to mash the rice grains; you want them to remain distinct but sticky. If you like, you can also add a tiny splash of water to your hands in the next step, which will help prevent the rice from sticking to you as you shape the onigiri.
Shape the Onigiri
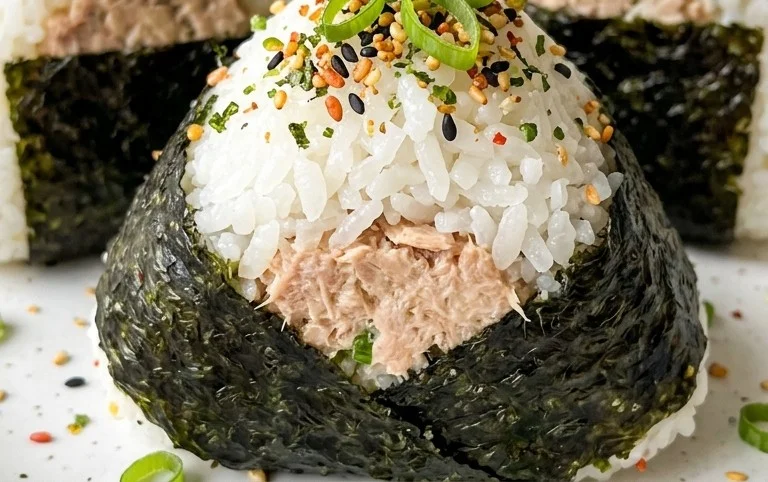
This is where the magic happens! Wet your hands with a little bit of water to prevent sticking, or lightly dampen them with water and then sprinkle a tiny pinch of salt onto your palms – this is a traditional method that also adds a subtle savory note to the outside of the onigiri. Take about half of the seasoned rice and place it into the palm of one hand. Gently press it down to form a shallow cup. Spoon about 1 to 2 tablespoons of your prepared tuna mayo filling into the center of the rice cup. Don’t overfill it, or it will be difficult to enclose. Now, carefully bring the edges of the rice up and around the filling, enclosing it completely. With your other hand, begin extract to gently shape the rice into a ball or a triangle. A common and classic shape is a triangle, which is achieved by pressing the sides of the ball between your thumb and index finger, then turning and pressing again to form the corners. Alternatively, you can simply shape it into a neat ball. The key is to be firm enough to hold its shape, but not so firm that you end up with a dense, hard rice ball. Aim for a light but compact consistency. Repeat this process with the remaining rice and filling, making sure each onigiri is well-senon-alcoholic aled.
Wrap with Nori
Now it’s time to add that iconic nori wrapper. Take one of your nori sheets. If you’re using full sheets, you might want to cut them into smaller strips, about 1-inch wide and 3-4 inches long, for easier handling. If you prefer less nori, you can simply tear or cut the sheet in half. Wrap a strip of nori around the bottom or side of your shaped onigiri. The moisture from the rice will help the nori stick. If you’re making a traditional triangle, a strip of nori on one side is perfect. For a ball, you can wrap it around the middle or a portion of it. Press the ends of the nori gently to secure them. This step adds a delightful umami flavor and a satisfying texture contrast to the soft rice.
Garnish and Serve
The final flourish! If you’re using sesame seeds, this is when you add them. Sprinkle the 1 teaspoon of sesame seeds over the onigiri, particularly on the nori or the exposed rice areas. The toasted sesame seeds add a lovely nutty aroma and a visual appeal. They are entirely optional but highly recommended for that extra layer of flavor and texture. Your delicious, homemade Japanese Tuna Onigiri are now ready to be enjoyed! Serve them immediately while they’re still warm, or let them cool to room temperature. They are fantastic on their own, packed in a bento box for lunch, or as a quick and healthy snack. They will stay fresh at room temperature for a few hours, making them perfect for on-the-go snacking.
Notes:
*If you’re making fresh rice: For the best results, use a rice cooker. Measure 1 cup of short-grain Japanese rice, rinse it thoroughly under cold running water until the water runs clear (this removes excess starch), drain it, and then add 1.2 cups of water. Cook according to your rice cooker’s instructions. Once cooked, let it steam for about 10-15 minutes before fluffing and proceeding with the recipe.
Conclusion:
There you have it – delicious and incredibly quick Japanese Tuna Onigiri ready in just 15 minutes! This recipe is a true lifesaver for busy days, offering a healthy, satisfying, and incredibly versatile snack or light meal. The simple combination of perfectly cooked rice, flavorful tuna filling, and the satisfying bite of nori creates a taste of Japan that’s accessible to everyone. It’s incredibly forgiving and adaptable, making it a fantastic way to use up leftover rice or experiment with different flavor profiles. I genuinely hope you give this recipe a try – it’s a game-changer for quick lunches or when you need a speedy, wholesome bite.
These delightful onigiri are fantastic on their own, but they also pair wonderfully with a simple miso soup or a small side salad for a more complete meal. Don’t be afraid to get creative with your fillings! Consider adding chopped pickles, a drizzle of soy sauce, some mayonnaise for creaminess, or even some furikake for extra flavor and texture. The possibilities are truly endless, and each variation will bring a unique twist to your Japanese Tuna Onigiri.
Frequently Asked Questions about Japanese Tuna Onigiri:
Can I make the rice ahead of time?
Absolutely! You can cook your rice a day in advance and store it in the refrigerator. When you’re ready to make the onigiri, simply warm the rice gently before shaping. It might be slightly firmer, which can actually make shaping easier.
What kind of tuna is best for onigiri?
Canned tuna packed in oil or water both work well. Drain it thoroughly to prevent the onigiri from becoming soggy. Many people prefer tuna packed in oil for a richer flavor, but tuna in water is a great lighter option.
How long do the onigiri last?
For the best taste and texture, onigiri are best enjoyed the same day they are made. If you have leftovers, store them in an airtight container in the refrigerator for up to 1-2 days. Reheat gently in a microwave or a dry pan before eating.
15-min. Easy Japanese Tuna Onigiri
Quick and simple Japanese rice balls filled with seasoned tuna and mayonnaise.
Ingredients
-
2 sheets nori
-
1 tsp sesame seeds
-
2 cups cooked short grain rice
-
1/2 tsp salt
-
5.29 oz canned tuna
-
2 tbsp Japanese mayo
Instructions
-
Step 1
Drain the canned tuna and place it in a small bowl. Add the Japanese mayo and salt. Mix well until thoroughly combined. If using sesame seeds, stir them in now. -
Step 2
Lightly wet your hands with water and sprinkle a pinch of salt on your palms. This prevents the rice from sticking. -
Step 3
Take about 1/2 cup of cooked rice and place it on your salted palm. Make an indentation in the center of the rice. -
Step 4
Spoon about 1-2 tablespoons of the tuna mixture into the indentation. -
Step 5
Gently cover the tuna mixture with more rice, forming a ball or triangle shape. Pat it firmly to shape it. -
Step 6
Cut the nori sheets into desired sizes (strips or squares) to wrap around the onigiri. Wrap the nori around the rice ball.
Important Information
Nutrition Facts (Per Serving)
It is important to consider this information as approximate and not to use it as definitive health advice.
Allergy Information
Please check ingredients for potential allergens and consult a health professional if in doubt.