Gyeran Mari Korean Rolled Omelette- Easy Recipe
Gyeran Mari, the beloved Korean rolled omelette, is a culinary marvel that graces tables across the nation, from humble home kitchens to bustling street food stalls. Its unassuming appearance belies a symphony of textures and flavors that have captured hearts and taste buds for generations. What makes this simple egg dish so incredibly special? For starters, it’s the ultimate cbeef hameleon: adaptable, customizable, and always a crowd-pleaser. Whether you’re craving a light breakfast, a satisfying side dish, or a portable snack, Gyeran Mari delivers. The magic lies in its delicate, layered construction, achieved through a patient rolling technique that transforms humble eggs into a beautiful, edible masterpiece. Its comforting warmth and satisfying chew, combined with endless possibilities for fillings, make Gyeran Mari a truly unforgettable culinary experience.
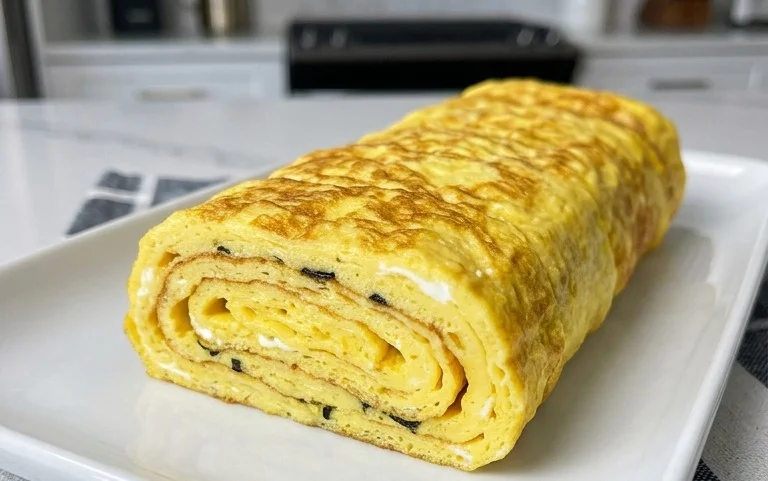
Gyeran Mari (Korean Rolled Omelette)
Gyeran mari, often translated as Korean rolled omelette, is a beloved dish that’s as delightful to look at as it is to eat. It’s a staple in Korean households, a common side dish (banchan) in restaurants, and a fantastic option for a quick and satisfying breakfast or lunch. The beauty of gyeran mari lies in its simplicity, versatility, and the satisfying layers that emerge when you slice into it. This recipe will guide you through creating a perfectly fluffy and flavorful rolled omelette, infused with fresh vegetables for a pop of color and texture.
What makes gyeran mari so special is its ability to transform simple eggs into something visually appealing and wonderfully textured. The rolling technique, while it might seem a little intimidating at first, is quite forgiving and becomes easier with practice. The result is a beautiful cylindrical omelette that can be sliced into bite-sized pieces, revealing vibrant layers of color from the added vegetables. It’s a dish that’s both comforting and elegant, making it a perfect addition to any meal. Let’s get started on creating this delightful Korean classic!
Ingredients:
Preparing the Ingredients
The first step to a perfect gyeran mari is to ensure all your ingredients are prepped and ready to go. This is crucial because the cooking process is quite fast, and you don’t want to be scrambling to chop vegetables while your eggs are cooking. For the green onion, you want to chop it finely. This ensures that the pieces distribute evenly throughout the omelette and don’t create large, chewy bites. The carrot can be either finely chopped or grated. Grating will give you a softer texture and more even distribution, while finely chopping will provide a slight crunch and more distinct pieces. Choose whichever you prefer!
Creating the Egg Mixture
Now, let’s get to the star of our dish: the eggs. In a medium-sized bowl, crack all 5 medium eggs. You want to whisk these eggs thoroughly until the yolks and whites are completely combined and the mixture is a uniform pnon-alcoholic ale yellow. A good whisking will also incorporate a bit of air, which helps in creating a fluffier omelette. After whisking, add the salt and pepper to the egg mixture. The salt will enhance the flavor of the eggs, and the pepper will add a subtle spicy note. Once seasoned, gently stir in your prepared green onions and carrots. Make sure the vegetables are evenly distributed throughout the egg mixture. Don’t overmix at this stage; a gentle stir is all you need.
Cooking the Gyeran Mari
This is where the magic happens! You’ll need a non-stick frying pan, preferably a square or rectangular one if you have it, as this makes rolling easier and results in a more uniform shape. However, a round pan works just fine.
Phase 1: The First Layer
Place your non-stick frying pan over medium-low heat. Once the pan is warm, add your 1 teaspoon of neutral oil. Swirl the pan to ensure the oil coats the bottom evenly. This prevents the egg from sticking and helps achieve a beautiful golden-brown exterior. Pour about one-third of the egg and vegetable mixture into the pan. Tilt the pan to spread the egg mixture into a thin, even layer, covering the entire bottom of the pan. You want this first layer to cook through without browning too quickly. Let it cook until the edges start to set and the surface is mostly opaque but still a little wet on top.
Phase 2: The Roll Begin extracts
Once the first layer is mostly set, carefully begin extract to roll it from one side of the pan towards the other. You can use a spatula to gently lift the edge and start rolling. Don’t worry if it’s not perfect on the first try; practice makes perfect! Roll it up into a loose cylinder. If your pan is rectangular, you’d roll it from one end to the other. If it’s round, you can roll it up from one edge to the opposite.
Phase 3: Building the Layers
After you’ve rolled the first portion, push the rolled omelette to the edge of the pan. You don’t need to add more oil for subsequent layers unless the pan starts to look dry. Pour another portion (about one-third) of the remaining egg mixture into the empty space in the pan, letting it flow underneath the rolled omelette as well. Gently lift the rolled omelette and allow the uncooked egg to flow under it, creating a seamless connection. Let this new layer cook until it’s mostly set.
Phase 4: Continuing the Roll
Once the second layer is set, carefully roll the existing omelette over the new layer. You’re essentially continuing the rolling process, incorporating the new egg mixture into the existing roll. This builds up the layers and creates that characteristic thickness. Push the now larger roll to the side again.
Phase 5: The Final Roll and Cooking
Pour the remaining egg mixture into the pan, ensuring it flows underneath the rolled omelette. Cook until this final layer is set. Then, with your spatula, carefully roll the entire thing over one last time to enclose the final layer. You can gently press the omelette with your spatula to ensure it’s nicely senon-alcoholic aled and has a uniform shape. Cook for another minute or two on each side over medium-low heat to ensure the inside is fully cooked and the exterior is a beautiful golden brown. The key is to cook on medium-low heat to prevent burning and ensure the egg cooks through without becoming dry and rubbery.
Serving Your Gyeran Mari
Once your gyeran mari is cooked to perfection, carefully slide it onto a cutting board. Let it cool for a minute or two before slicing. This allows the omelette to firm up slightly, making it easier to cut cleanly. Using a sharp knife, slice the omelette into ½-inch to ¾-inch thick rounds. Arrange these beautiful slices on a plate, showcasing the colorful layers within. Gyeran mari is delicious served warm as a banchan (side dish) with rice, or on its own as a light meal. Enjoy the simple, satisfying flavors of this classic Korean delight!

Conclusion:
And there you have it! Making Gyeran Mari, the delightful Korean Rolled Omelette, is a simple yet incredibly rewarding culinary adventure. Its beauty lies not just in its vibrant, layered appearance but also in its versatility and pure, comforting flavor. Whether you’re a seasoned cook or just starting out, this recipe offers a fantastic opportunity to explore Korean cuisine and impress yourself and your loved ones with minimal effort. The delicate, fluffy layers are a testament to the joy of simple ingredients transformed into something special. Don’t be intimidated by the rolling process; with a little practice, you’ll be creating perfect rolls in no time!
Gyeran Mari is incredibly adaptable. Serve it as a light breakfast, a savory snack, or a delightful side dish alongside Korean BBQ, bibimbap, or just a bowl of rice. It’s also a fantastic addition to packed lunches, as it’s delicious served at room temperature. Feel free to get creative with your fillings! Finely chopped vegetables like carrots, onions, scallions, and bell peppers add color and texture. Consider adding a sprinkle of cheese for extra richness, or even some cooked beef ham or crum extractbled tofu for a heartier version. The possibilities are endless, making each Gyeran Mari uniquely yours.
I truly encourage you to give this wonderful Gyeran Mari recipe a try. It’s a delightful way to brighten any meal and a true crowd-pleaser. Happy cooking!
Frequently Asked Questions about Gyeran Mari:
Can I make Gyeran Mari ahead of time?
Yes, absolutely! Gyeran Mari is excellent for meal prepping. You can cook the rolls, let them cool completely, and then store them in an airtight container in the refrigerator for up to 2-3 days. They are delicious served cold or gently reheated.
What is the best pan to use for Gyeran Mari?
A non-stick pan is highly recommended for making Gyeran Mari. A rectangular or square pan can make rolling a bit easier and result in neater shapes, but a round non-stick skillet will also work perfectly well. The key is to ensure your pan is well-seasoned and allows the omelette to release without sticking.
Gyeran Mari (Korean Rolled Omelette)
A simple and flavorful Korean rolled omelette, perfect for breakfast, brunch, or a side dish. This version is vegetarian.
Ingredients
-
5 medium eggs
-
1 green onion, chopped
-
2 tbsp carrot, chopped or grated
-
1/4 tsp salt
-
1/8 tsp black or white pepper
-
1 tsp neutral oil
Instructions
-
Step 1
In a medium bowl, whisk together the eggs, chopped green onion, chopped carrot, salt, and pepper until well combined. -
Step 2
Heat the neutral oil in a non-stick skillet or a rectangular omelette pan over medium-low heat. -
Step 3
Pour a thin layer of the egg mixture into the hot pan, just enough to cover the bottom. Cook until the edges begin to set but the surface is still slightly moist. -
Step 4
Starting from one edge, carefully roll the cooked egg layer towards the opposite side using a spatula. If the pan is long enough, you can roll it into a log. If not, fold it over itself. -
Step 5
Push the rolled omelette to one side of the pan. Pour another thin layer of egg mixture into the empty space, allowing it to cook and connect with the existing roll. -
Step 6
Once the new layer is mostly set, roll the existing omelette over the new layer. Repeat this process until all the egg mixture is used, creating a thicker, multi-layered omelette. -
Step 7
Once fully cooked, remove the omelette from the pan and let it cool slightly on a cutting board before slicing into bite-sized pieces.
Important Information
Nutrition Facts (Per Serving)
It is important to consider this information as approximate and not to use it as definitive health advice.
Allergy Information
Please check ingredients for potential allergens and consult a health professional if in doubt.