Easy Oreo Cake Balls- Irresistible No-Bake Treats
Oreo Cake Balls are the ultimate bite-sized indulgence, and if you haven’t tried them yet, you’re seriously missing out on some serious joy. Imagin extracte the irresistible crunch of an Oreo cookie, transformed into a moist, cakey center, all enrobed in a luscious chocolate coating. It’s a flavor combination that’s universally adored, and these little spheres of happiness perfectly capture that magic. What makes Oreo Cake Balls so special is their incredible versatility and sheer deliciousness. They’re incredibly easy to make, making them a perfect project for bakers of all skill levels, and they disappear from any party platter in a flash. Whether you’re craving a sweet treat for yourself or looking for an impressive (yet surprisingly simple!) dessert to share, these delightful Oreo Cake Balls are guaranteed to be a showstopper.
Why You’ll Love These Oreo Cake Balls:
Perfect for Parties and Potlucks
Effortlessly Delicious
A Crowd-Pleasing Favorite
Oreo Cake Balls
Get ready to delight your taste buds with these incredibly easy and utterly delicious Oreo Cake Balls! These little bites of heaven are perfect for parties, bake snon-alcoholic ales, or simply as a special treat to brighten your day. They’re incredibly simple to make, requiring no baking whatsoever, which makes them a fantastic option for a quick dessert fix. The combination of crushed Oreos and creamy frosting, all enrobed in a sweet white chocolate coating, is pure bliss. Let’s dive in and create some magic!
Ingredients:
Getting Started: Preparing the Base
The foundation of our Oreo Cake Balls is a simple, no-bake mixture that’s surprisingly rich and satisfying. The first step is to get our Oreo cookies ready. You’ll want to crush these into fine crum extractbs. A food processor is your best friend here, making quick work of this task. If you don’t have a food processor, you can place the Oreos in a sturdy zip-top bag, seal it tightly, and then use a rolling pin or the flat bottom of a heavy pan to crush them. Aim for a fine crum extractb consistency, almost like coarse sand. Don’t worry if there are a few slightly larger pieces; they can add a nice texture.
Once your Oreos are perfectly crushed, it’s time to introduce the cream cheese. Make sure your cream cheese is truly softened. This means taking it out of the refrigerator at least an hour or two before you plan to start. Softened cream cheese will incorporate much more smoothly into the cookie crum extractbs, creating a cohesive mixture. Add the softened cream cheese to the bowl with the Oreo crum extractbs. Now, using a spatula or your hands, mix them together until the cream cheese is fully incorporated and the mixture holds together when squeezed. It should resemble a dough-like consistency. If it feels too dry and crum extractbly, you can add another tablespoon of softened cream cheese.
Forming the Cake Balls
Now comes the fun part: rolling! Take small portions of the Oreo and cream cheese mixture and roll them between your palms to form uniform balls. The size is entirely up to you, but I find that about 1-inch diameter balls work perfectly. They’re a good size for popping into your mouth and make for a beautiful presentation when all lined up. As you roll them, you might notice the mixture is a little sticky. This is perfectly normal. If it becomes unmanageable, you can lightly dust your hands with a tiny bit of powdered sugar, but try to avoid adding too much as it can alter the flavor and texture. Place the formed balls onto a baking sheet lined with parchment paper. This prevents them from sticking and makes them easy to transfer.
Once all the mixture is rolled into balls, it’s crucial to let them firm up. Place the baking sheet in the freezer for at least 30 minutes. This chilling process is vital. It makes the cake balls firm enough to handle when dipping them into the melted candy coating without falling apart or losing their shape. If you’re short on time, you can pop them in the refrigerator for about an hour, but freezing is generally more effective. You can even make these ahead of time and store them in an airtight container in the freezer for several weeks, making them a fantastic make-ahead treat for any occasion.
Melting and Dipping: The Sweet Coating
While your Oreo balls are chilling, it’s time to prepare the candy coating. This is where the magic happens! In a microwave-safe bowl, add your white candy melts. These are specifically designed to melt smoothly and harden beautifully, making them ideal for coating treats. Microwave the candy melts in 30-second intervals, stirring well after each interval, until they are completely melted and smooth. Be patient; you don’t want to overheat them, as they can seize up. If the candy coating seems too thick to work with, you can add the heavy cream, one tablespoon at a time, stirring until you achieve a smooth, pourable consistency. This optional step helps thin out the coating for easier dipping, but be cautious not to add too much, as it can make the coating too soft when it hardens.
Now for the dip! Take your chilled Oreo cake balls, one by one, and carefully drop them into the melted white candy coating. Use a fork or a dipping tool to ensure they are fully submerged and coated on all sides. Gently lift the coated ball out of the candy melt, allowing any excess to drip back into the bowl. This step requires a bit of practice, so don’t be discouraged if your first few aren’t perfect. You can use a toothpick to help guide them or even gently tap the fork on the side of the bowl to encourage excess coating to drip off. Place the coated cake ball back onto the parchment-lined baking sheet.
Finishing Touches and Decoration
As soon as the cake balls are coated, it’s time for those delightful finishing touches. While the white chocolate coating is still wet, sprinkle the crushed Oreo cookies generously over the tops. This not only adds a wonderful texture and intense Oreo flavor but also helps to hide any imperfections in the coating. You can use the back of a spoon to gently press them in if needed. For an extra touch of elegance and flavor, melt a small handful of semi-sweet chocolate chips in a separate microwave-safe bowl (again, using 30-second intervals and stirring) until smooth. Transfer the melted semi-sweet chocolate to a piping bag or a small zip-top bag with the corner snipped off. Drizzle the chocolate artfully over the decorated cake balls. This contrast of white and dark chocolate is visually appealing and adds another layer of deliciousness.
Once decorated, allow the Oreo Cake Balls to set completely. You can leave them at room temperature if your house is cool, or for a quicker set, place the baking sheet back into the refrigerator for about 15-20 minutes until the coating is firm. And there you have it – beautiful, homemade Oreo Cake Balls ready to be enjoyed! Store any leftovers in an airtight container in the refrigerator. These are always a crowd-pleaser and a delightful way to satisfy your sweet cravings. Enjoy every single bite!
Conclusion:
And there you have it! Crafting these delightful Oreo cake balls is an incredibly rewarding experience. They are a showstopper for any occasion, a guaranteed crowd-pleaser, and surprisingly simple to make, making them perfect for both seasoned bakers and begin extractners. Their rich chocolatey flavor, combined with the satisfying crunch of crushed Oreos, creates an irresistible treat that always brings smiles. Whether you’re preparing for a birthday party, a holiday gathering, or just craving something sweet, these cake balls are an excellent choice.
Consider serving them as part of a dessert bar, alongside other sweet confections, or even as a unique party favor. For variations, feel free to experiment with different coatings – white chocolate, milk chocolate, or even a swirl of both! You could also add a pinch of peppermint extract to the filling for a festive twist, or mix in some colorful sprinkles for added visual appeal. Don’t be afraid to get creative and make them your own!
I highly encourage you to give this Oreo cake ball recipe a try. The process is fun, and the end result is truly delicious. You’ll be amazed at how quickly they disappear!
Frequently Asked Questions:
Can I make Oreo cake balls ahead of time?
Absolutely! Oreo cake balls can be made up to 2-3 days in advance. Store them in an airtight container in the refrigerator. It’s best to let them come to room temperature for about 15-20 minutes before serving for optimal texture and flavor.
What’s the best way to store leftover Oreo cake balls?
Store any leftover Oreo cake balls in an airtight container at room temperature for a day or two, or in the refrigerator for up to a week. If refrigerated, remember to let them sit out for a bit before enjoying to soften them up.
My cake balls are too crum extractbly. What did I do wrong?
This usually means you haven’t incorporated enough of the frosting. Ensure you are mixing the crushed Oreos and frosting thoroughly until a dough-like consistency forms that holds its shape when rolled. If it’s still too dry, add a tiny bit more frosting, one teaspoon at a time, until it’s manageable.
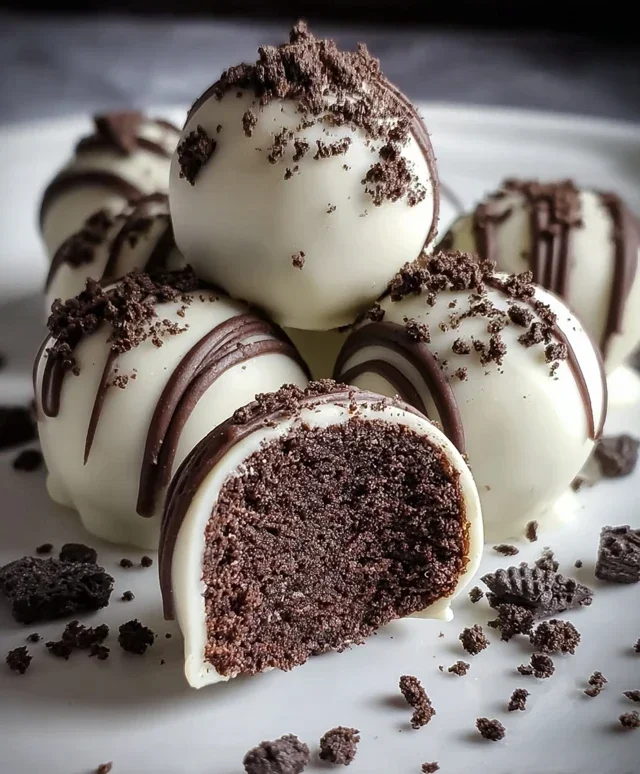
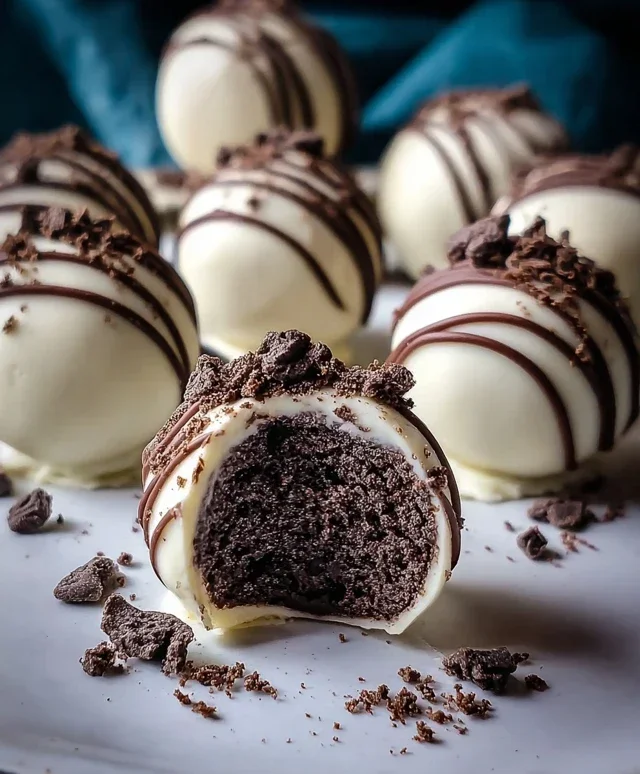
Oreo Cake Balls
Decadent and easy-to-make Oreo cake balls, perfect for parties or a sweet treat. Made with crushed Oreos and cream cheese, coated in white candy melts.
Ingredients
-
24 Oreo cookies (regular size, about one standard package)
-
4 oz cream cheese, softened
-
10 oz white candy melts (Ghirardelli brand recommended)
-
2 tablespoons heavy cream (optional, only if needed to thin candy coating)
-
Crushed Oreo cookies for sprinkling
-
Semi-sweet chocolate chips for drizzling
Instructions
-
Step 1
Crush the Oreo cookies in a food processor until fine crumbs form. Reserve about 1/4 cup of crumbs for sprinkling. -
Step 2
In a medium bowl, combine the crushed Oreos (minus the reserved crumbs) and softened cream cheese. Mix until well combined and a dough-like consistency is formed. -
Step 3
Roll the mixture into small balls, about 1 inch in diameter. Place them on a baking sheet lined with parchment paper and freeze for at least 15-20 minutes until firm. -
Step 4
Melt the white candy melts according to package directions, either in the microwave or using a double boiler. If the coating is too thick, stir in 1 tablespoon of heavy cream at a time until desired consistency is reached. -
Step 5
Dip each frozen Oreo ball into the melted candy coating, ensuring it’s fully coated. Let excess drip off and return to the parchment-lined baking sheet. -
Step 6
While the coating is still wet, sprinkle the cake balls with the reserved crushed Oreo cookies. -
Step 7
Melt the semi-sweet chocolate chips and drizzle over the cake balls. Allow the coating to set completely before serving.
Important Information
Nutrition Facts (Per Serving)
It is important to consider this information as approximate and not to use it as definitive health advice.
Allergy Information
Please check ingredients for potential allergens and consult a health professional if in doubt.