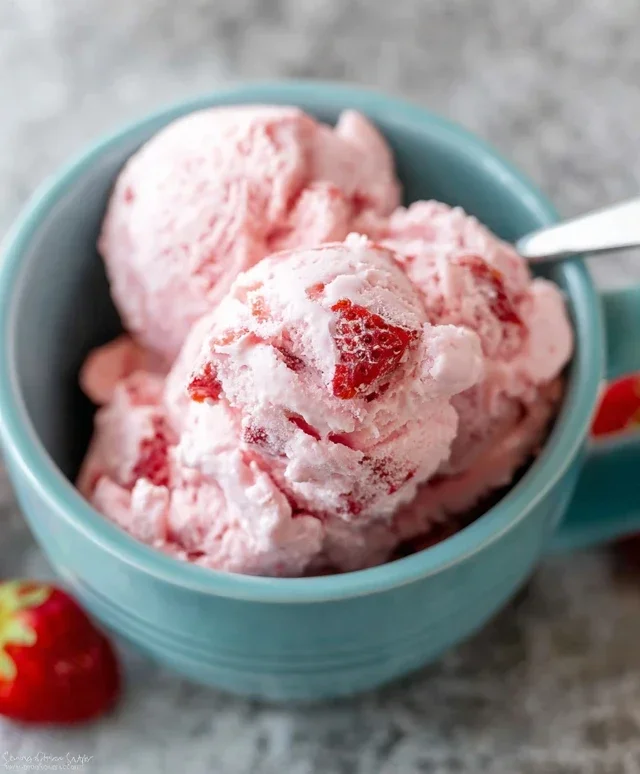
Easy Homemade Strawberry Ice Cream Recipe
Homemade strawberry ice cream is more than just a dessert; it’s a pure, unadulterated taste of summer captured in a creamy, dreamy swirl. Who doesn’t melt at the thought of that vibrant pink hue and the sweet, slightly tart burst of sun-ripened strawberries? This isn’t your average store-bought scoop. When you make homemade strawberry ice cream, you’re in control of the quality, the sweetness, and the intensity of that classic strawberry flavor. Imagin extracte sinking your spoon into a bowl of ice cream bursting with real, juicy strawberries, their natural sweetness enhanced just so, without any artificial anything. It’s a simple pleasure, a nostalgic trip back to childhood picnics and warm evenings, all made better because you brought it to life in your own kitchen.
Why You’ll Love This Recipe
The Ultimate Guide to Perfect Homemade Strawberry Ice Cream
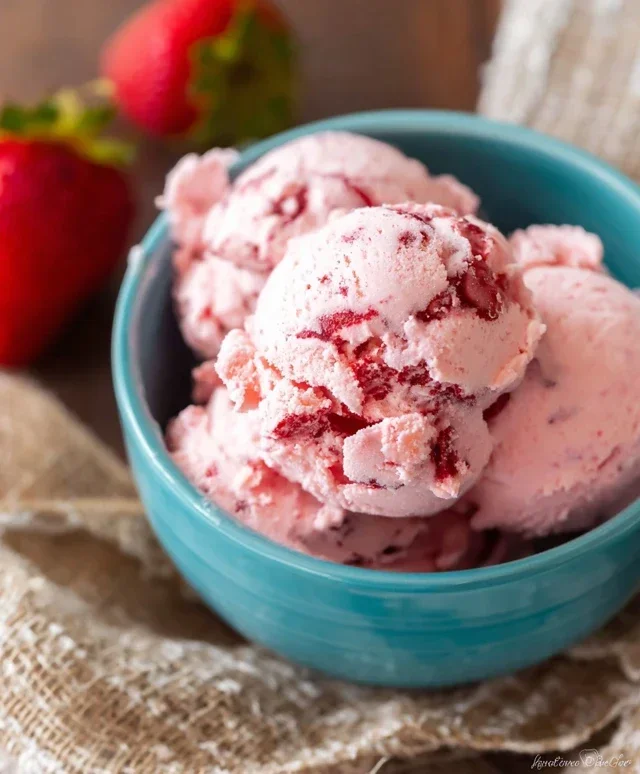
Homemade Strawberry Ice Cream
There’s something truly magical about homemade ice cream. The creamy texture, the vibrant flavor, the sheer satisfaction of creating something so delicious from scratch – it’s an experience that store-bought simply can’t replicate. And when it comes to classic flavors, nothing quite beats the sweet, slightly tart burst of fresh strawberries. This recipe for homemade strawberry ice cream is designed to be wonderfully simple, yet yields a scoop of pure bliss. You won’t need any fancy ice cream maker for this version, making it accessible to everyone with a freezer and a little bit of patience. Get ready to impress yourself and your loved ones with this delightful, no-churn treat.
Ingredients:
Preparing the Strawberry Base
The foundation of any great strawberry ice cream is, of course, fantastic strawberries. For the best flavor, I highly recommend using fresh, ripe strawberries. If you’re making this out of season, good quality frozen strawberries can also work, just be sure to thaw them completely and drain off any excess liquid before proceeding. We’ll be creating a quick strawberry compote that will infuse our ice cream with that intense fruity goodness.
First, in a medium bowl, combine your diced strawberries with the honey, granulated sugar, and lemon juice. The honey adds a subtle floral sweetness that complements the strawberries beautifully, while the sugar provides the necessary sweetness for a classic ice cream. The lemon juice is a secret weapon here; it brightens the strawberry flavor and helps to balance the sweetness, preventing it from becoming cloying. Give everything a gentle stir to coat the strawberries evenly.
Now, we need to let these ingredients meld together and release their juices. You can let this mixture sit at room temperature for about 30 minutes, or if you’re short on time, you can speed things up by gently heating it. If you choose to heat it, place the bowl over a saucepan of simmering water (a double boiler setup) or microwave it in short bursts, stirring in between, until the sugar has dissolved and the strawberries have softened slightly. The goal isn’t to cook them into a jam, but rather to encourage them to release their delicious juices and create a slightly syrupy consistency. Once done, set this strawberry mixture aside to cool completely. This step is crucial; adding warm ingredients to your cream base will not result in proper freezing.
Creating the Creamy Ice Cream Base
While our strawberry mixture is cooling, we’ll prepare the creamy component of our ice cream. This is where the richness and smooth texture come from. In a separate large bowl, pour in the cold heavy whipping cream and the half and half. The heavy whipping cream provides the essential fat content that makes ice cream decadent and helps it to freeze without becoming icy. The half and half adds a touch more liquid and a slightly lighter texture, creating a beautiful balance.
Now, add the vanilla extract to the cream mixture. Vanilla is a classic pairing with strawberries, enhancing their natural sweetness and adding another layer of aroma and flavor. Using good quality vanilla extract will make a noticeable difference in the final taste of your ice cream.
Using an electric mixer, start by beating the cream mixture on medium speed. You’re looking to whip the cream until it thickens and holds soft peaks. This means when you lift the beaters, the cream should form peaks that gently curl over. Be careful not to over-whip it to stiff peaks, as this can make the ice cream dense. The goal here is to incorporate some air without making it a whipped cream dessert.
Combining and Freezing
Once your strawberry mixture is completely cool and your cream base is whipped to soft peaks, it’s time to bring them together. Gently fold the cooled strawberry mixture into the whipped cream base. You can do this using a spatula or a whisk. The key here is to fold, not to stir vigorously. We want to distribute the strawberries and their syrup throughout the cream without deflating the air we’ve incorporated into the cream. Swirls of strawberry are beautiful, so don’t worry about getting it perfectly uniform. You’ll see lovely streaks of red and white, which is exactly what we’re going for.
Pour the combined mixture into a freezer-safe container. An airtight container is best to prevent freezer burn and the absorption of any unwanted odors from your freezer. If you don’t have a lid, you can cover the top of the container tightly with plastic wrap, pressing it directly onto the surface of the ice cream mixture, and then cover the whole thing with foil.
Now comes the waiting game, which is arguably the hardest part! Place the container in the freezer. For the first 2-3 hours, it’s a good idea to stir the ice cream every hour or so. This helps to break up any ice crystals that may form, leading to a smoother, creamier texture. You can use a fork or a whisk to do this. After this initial period, you can let it freeze undisturbed for another 3-4 hours, or until it’s firm enough to scoop. The total freezing time will depend on your freezer’s temperature and the depth of your container.
Once your homemade strawberry ice cream is fully frozen and firm, let it sit at room temperature for about 5-10 minutes before scooping. This brief softening period will make it much easier to serve and will allow the flavors to truly shine. Enjoy the fruits of your labor – this homemade strawberry ice cream is a sweet reward that’s absolutely worth the wait!
Conclusion:
Making your own homemade strawberry ice cream is an incredibly rewarding experience, and this recipe makes it wonderfully accessible. You’ll discover the unparalleled joy of creamy, luscious ice cream bursting with the vibrant, natural flavor of fresh strawberries, without any artificial additives. It’s a delightful project for a sunny afternoon, a special occasion, or simply when a craving strikes! Imagin extracte sharing a scoop of this delightful creation with loved ones, knowing you made it all from scratch.
This versatile strawberry ice cream is fantastic on its own, but it truly shines when paired with warm chocolate brownies, a slice of shortcake, or topped with a drizzle of extra strawberry sauce. For a touch of elegance, consider a few fresh mint leaves. Feel free to experiment with variations! Add a splash of balsamic vinegar to deepen the strawberry flavor, fold in some chocolate chips for a classic twist, or swirl in a ribbon of lemon curd for a zesty contrast. I highly encourage you to give this recipe a try; you won’t be disappointed by the delicious results!
Frequently Asked Questions:
Can I make this without an ice cream maker?
Absolutely! While an ice cream maker yields the smoothest texture, you can achieve a delicious result by freezing the mixture in a shallow container and stirring vigorously every 30-45 minutes for the first 2-3 hours. This breaks up ice crystals, creating a creamier texture.
How long will homemade strawberry ice cream last?
Stored properly in an airtight container in the freezer, your delicious homemade strawberry ice cream should remain fresh and delicious for about 1 to 2 weeks. Beyond that, the texture might start to degrade, but it will still be edible!
What’s the best type of strawberries to use?
For the most intense and authentic flavor, use ripe, in-season fresh strawberries. If fresh strawberries are not available, frozen strawberries will also work well, though you may need to adjust the sweetness slightly as they can be less concentrated in flavor.
Homemade Strawberry Ice Cream
A refreshing and easy homemade strawberry ice cream recipe made with fresh strawberries and simple dairy ingredients.
Ingredients
-
1 1/2 cups strawberries, hulled and diced
-
2 Tbsp honey
-
1/2 cup granulated sugar
-
1 tsp lemon juice
-
1 cup heavy whipping cream
-
1/2 cup half and half
-
1 tsp vanilla extract
Instructions
-
Step 1
In a bowl, combine the diced strawberries, honey, granulated sugar, and lemon juice. Stir well and let sit for about 15 minutes to allow the strawberries to macerate and release their juices. -
Step 2
Transfer the macerated strawberry mixture to a blender or food processor. Puree until smooth. If you prefer a chunkier ice cream, reserve a few strawberry pieces before blending. -
Step 3
In a separate bowl, whisk together the heavy whipping cream, half and half, and vanilla extract until well combined. -
Step 4
Pour the strawberry puree into the cream mixture and stir until evenly incorporated. -
Step 5
Chill the mixture thoroughly in the refrigerator for at least 2 hours, or preferably overnight. This is crucial for proper churning. -
Step 6
Pour the chilled mixture into your ice cream maker and churn according to the manufacturer’s instructions. This typically takes 20-30 minutes. -
Step 7
Transfer the churned ice cream to an airtight container and freeze for at least 4-6 hours, or until firm, before serving.
Important Information
Nutrition Facts (Per Serving)
It is important to consider this information as approximate and not to use it as definitive health advice.
Allergy Information
Please check ingredients for potential allergens and consult a health professional if in doubt.