Perfect Grilled Pizza Recipe- Easy & Delicious
How to Make the Perfect Grilled Pizza, my friends, is a culinary adventure that will transform your backyard cookouts into something truly spectacular. Forget soggy crusts and unevenly cooked toppings; we’re talking about achieving that elusive, smoky char that only a grill can provide. Why do we absolutely adore grilled pizza? It’s the delightful marriage of crispy, airy dough kissed by flames and the freedom to customize every single topping imagin extractable. What makes this preparation so special is the beautiful alchemy that happens on the grill – the dough puffs up, develops those irresistible leopard spots, and the toppings get a lovely, rustic char that you just can’t replicate in a conventional oven. Get ready to impress your friends and family with this incredibly rewarding method of making the perfect grilled pizza.
How to Make the Perfect Grilled Pizza
There’s something incredibly satisfying about a perfectly cooked pizza, and when you take that deliciousness outdoors to the grill, it reaches a whole new level. The intense heat of the grill creates a crispy, slightly charred crust that’s impossible to replicate in a standard oven. Forget those soggy, undercooked pizza bases you might have experienced from grilling attempts. With a few key techniques and a little practice, you’ll be churning out restaurant-quality grilled pizzas that will impress your friends and family. This guide will walk you through everything you need to know to achieve pizza perfection on your grill.
Ingredients:
Preparing Your Grill and Dough
Before we even think about assembling our pizza, we need to get our grilling station ready. This is crucial for success and prevents a sticky, frustrating experience. Start by preheating your grill to medium-high heat, around 400-450 degrees Fahrenheit. You want it hot enough to sear the dough quickly, but not so hot that it burns before it cooks through. If you have a two-zone grilling setup (one side with direct heat, the other with indirect heat), this will be incredibly helpful. Aim to have one side hotter for the initial searing and the other slightly cooler for finishing the pizza.
While the grill is heating, it’s time to prepare your pizza dough. If you’re using store-bought dough, let it come to room temperature for at least 30 minutes. This makes it much easier to stretch and prevents it from snapping back. Gently punch down your dough and divide it into two or three equal portions, depending on how large you want your pizzas. On a lightly floured surface, or better yet, dusted with cornmeal or semolina flour (this adds a delightful crunch and prevents sticking), begin extract to stretch or roll out each portion of dough into your desired pizza shape. I like to aim for a rustic, oval shape as it’s easier to manage on the grill. Avoid overworking the dough; if it resists stretching, let it rest for a few minutes and try again. Once stretched, brush both sides of your pizza bases lightly with olive oil. This oil is key to achieving that beautiful golden-brown, crispy crust.
Grilling the Pizza Bases
This is where the magic begin extracts. Carefully transfer one of your oiled pizza dough bases directly onto the hot grill grates. Close the lid and cook for about 2-4 minutes. You’re looking for the dough to puff up slightly and develop golden-brown grill marks. Resist the urge to peek too often; every time you lift the lid, you lose precious heat.
Once you see those gorgeous grill marks and the dough has firmed up enough to handle, carefully use a spatula and tongs to flip the pizza dough over. You’re now ready to start building your pizza on the second, grilled side. This grilled side will be the bottom of your pizza, so it’s important it has a good foundation.
Assembling and Finishing Your Grilled Pizza
With the dough flipped, it’s time to add your toppings. Work relatively quickly, as the grill is still hot and you don’t want the dough to overcook before the cheese melts. Spread an even layer of your tomato or pizza sauce over the grilled side, leaving a small border for the crust. Next, scatter your mozzarella cheese and Parmesan cheese over the sauce. Add your desired toppings on top of the cheese. Remember that less is often more on a grilled pizza; too many toppings can weigh it down and prevent even cooking.
Once assembled, carefully close the grill lid. You can now either move the pizza to the cooler side of the grill (if you have a two-zone setup) or reduce the heat to medium. Continue grilling for another 4-8 minutes, or until the cheese is melted and bubbly, and the crust is golden brown and cooked through. Keep a close eye on it during this stage, as grilled pizzas can go from perfect to burnt very quickly. Rotate the pizza if necessary to ensure even cooking.
The Final Touches
Once your grilled pizza is cooked to perfection, carefully remove it from the grill using a large spatula or pizza peel. Transfer it to a cutting board. Drizzle a little extra olive oil over the crust if you desire, and then scatter fresh basil leaves over the top. A sprinkle of salt and freshly ground black pepper can also enhance the flavors. Let the pizza rest for a minute or two before slicing and serving. This allows the cheese to set slightly and prevents it from oozing out when you cut into it. Enjoy the fruits of your labor – a truly spectacular grilled pizza!

Conclusion:
And there you have it! By following these simple steps, you’re well on your way to achieving the perfect grilled pizza, a truly spectacular culinary feat that will impress your friends and family. The beauty of this recipe lies in its simplicity and the incredible, smoky flavor that grilling imparts, creating a delightful char on the crust and perfectly melted toppings. It’s a fantastic way to elevate your pizza night beyond the ordinary oven. Imagin extracte the satisfaction of pulling a golden-brown, bubbling masterpiece off the grill – it’s a taste sensation that’s hard to beat.
Serve your perfect grilled pizza hot off the grates with a simple side salad or some grilled vegetables for a complete meal. For variations, don’t hesitate to experiment! Try a classic Margherita with fresh basil, a spicy beef pepperoni with jalapeños, or get creative with white pizzas featuring ricotta, garlic, and spinach. The possibilities are truly endless once you master the grilling technique.
I truly encourage you to give this a try. It’s a rewarding and delicious experience that will quickly become a summer staple. Embrace the smoky, slightly charred perfection and enjoy the amazing results!
Frequently Asked Questions:
Can I use store-bought pizza dough for grilled pizza?
Absolutely! While homemade dough is wonderful, good quality store-bought pizza dough works beautifully for grilled pizza. Just be sure to let it come to room temperature before stretching and grilling, as this makes it more pliable and easier to handle.
What’s the best way to prevent the dough from sticking to the grill?
A well-oiled grill is key! Make sure your grates are clean and generously oiled before you place the dough on. Also, working with a lightly floured surface when shaping the dough can help prevent sticking.
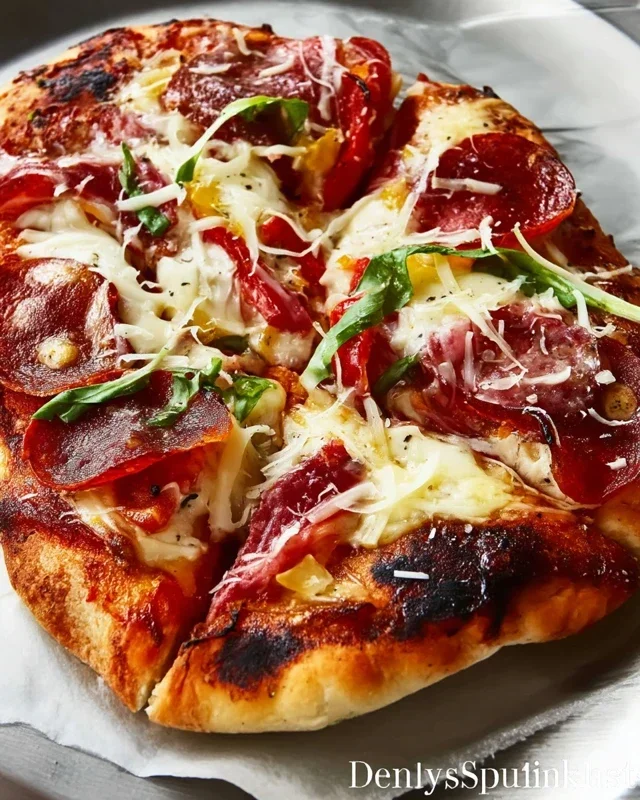
Perfect Grilled Pizza
Achieve a smoky, crispy crust with this simple guide to making delicious pizza on the grill.
Ingredients
-
1 pound pizza dough
-
1/2 cup tomato sauce
-
8 ounces shredded mozzarella cheese
-
4 ounces sliced pepperoni
-
1/4 cup chopped fresh basil
-
2 tablespoons olive oil
Instructions
-
Step 1
Preheat your grill to medium-high heat (around 400-450°F or 200-230°C). -
Step 2
Lightly flour a clean surface and stretch or roll out the pizza dough to your desired shape and thickness. -
Step 3
Brush one side of the dough with olive oil. Carefully place the dough, oiled-side down, onto the hot grill grates. Grill for 2-4 minutes until golden brown and grill marks appear. -
Step 4
Flip the dough. Quickly spread the tomato sauce over the grilled side, leaving a small border for the crust. Sprinkle evenly with mozzarella cheese and arrange pepperoni slices. -
Step 5
Close the grill lid and cook for another 5-8 minutes, or until the cheese is melted and bubbly and the crust is cooked through and golden. -
Step 6
Carefully remove the pizza from the grill. Sprinkle with fresh basil before slicing and serving.
Important Information
Nutrition Facts (Per Serving)
It is important to consider this information as approximate and not to use it as definitive health advice.
Allergy Information
Please check ingredients for potential allergens and consult a health professional if in doubt.