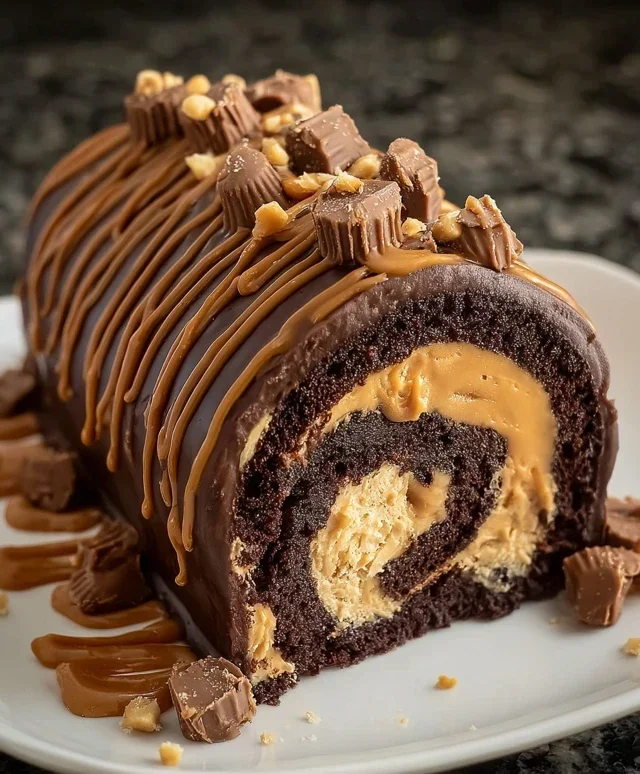
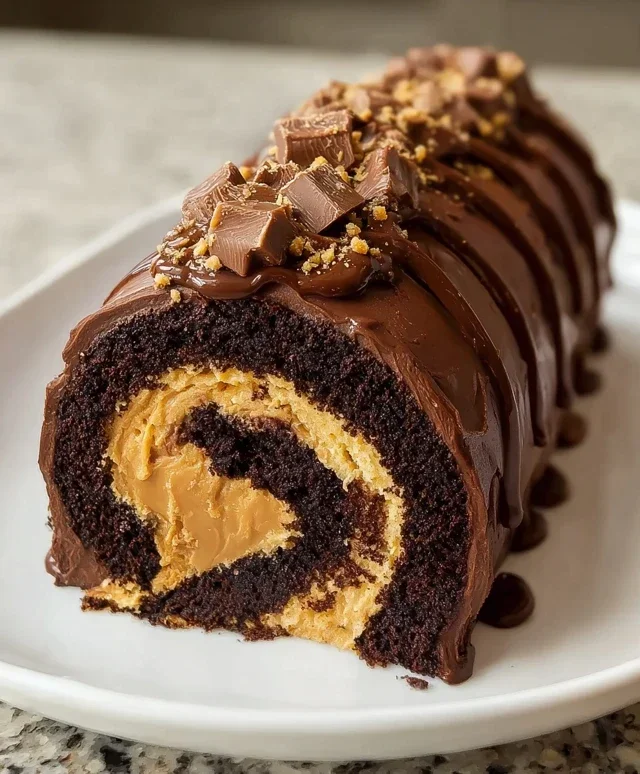
Peanut Butter Cup Chocolate Roll Cake-Decadent Dessert
Peanut Butter Cup Chocolate Roll Cake is more than just a dessert; it’s a delicious embrace of pure comfort and childhood joy. Who doesn’t remember the irresistible allure of a peanut butter cup, that perfect harmony of creamy peanut butter and rich chocolate? Now, imagin extracte those beloved flavors swirled into a tender, delicate chocolate cake, then rolled into an elegant masterpiece. This Peanut Butter Cup Chocolate Roll Cake captures that iconic taste and elevates it into a show-stopping dessert that’s surprisingly simple to create. It’s the ultimate crowd-pleaser, guaranteed to bring smiles and requests for seconds. What makes this particular Peanut Butter Cup Chocolate Roll Cake so special is the exquisite balance between the intensely chocolatey sponge and the sweet, salty peanut butter filling, all coming together in a visually stunning presentation that’s as delightful to behold as it is to devour.
Peanut Butter Cup Chocolate Roll Cake
Get ready to impress with this absolutely divine Peanut Butter Cup Chocolate Roll Cake! This dessert is a dream for any chocolate and peanut butter lover. It’s a surprisingly achievable treat that looks as spectacular as it tastes. The delicate chocolate sponge cake is rolled with a luscious peanut butter cream cheese filling, then finished with a drizzle of chocolate and a sprinkle of chopped peanut butter cups. It’s perfect for birthdays, holidays, or just because you deserve something truly special. Let’s dive into creating this showstopper!
Ingredients:
Creating the Chocolate Sponge Cake
The foundation of our delicious roll cake is a light and airy chocolate sponge. This is achieved by carefully combining our dry and wet ingredients and then whipping the eggs and sugar to perfection.
Cooling and Preparing for Rolling
Once the cake is baked, it needs to cool properly before we can even think about filling it. This cooling process is just as important as the baking itself for achieving a smooth roll.
Crafting the Peanut Butter Cream Cheese Filling
This filling is where the magic truly happens! It’s creamy, rich, and perfectly balanced with the sweetness of the peanut butter.
Assembling the Masterpiece
Now comes the exciting part – bringin extractg all these delicious components together!
Enjoy every decadent bite of your homemade Peanut Butter Cup Chocolate Roll Cake! It’s a guaranteed crowd-pleaser.
Conclusion:
I hope you’re as excited about this Peanut Butter Cup Chocolate Roll Cake as I am! This recipe truly delivers on all fronts: it’s a showstopper for any occasion, surprisingly manageable for home bakers, and utterly delicious. The combination of rich chocolate sponge, creamy peanut butter filling, and decadent chocolate ganache is simply irresistible. It’s the perfect way to satisfy those sweet cravings and impress your friends and family. Don’t be intimidated by the “roll cake” aspect – with a little patience, you’ll achieve beautiful results every time.
This stunning cake is fantastic on its own, but it also pairs wonderfully with a scoop of vanilla ice cream or a dollop of whipped cream. For variations, consider adding chopped peanut butter cups to the filling for extra texture, or swirling a little extra peanut butter into the ganache for an intensified flavor. I genuinely encourage you to give this Peanut Butter Cup Chocolate Roll Cake a try. It’s a rewarding baking experience that yields a truly memorable dessert.
Frequently Asked Questions:
Q: Can I make this Peanut Butter Cup Chocolate Roll Cake ahead of time?
Absolutely! The cake layers can be baked and even rolled while still warm, then cooled completely and wrapped tightly. The filling and ganache can also be prepared in advance. I often assemble the whole cake the day before serving, allowing the flavors to meld beautifully. Just ensure it’s stored in the refrigerator.
Q: My cake cracked when I tried to roll it. What did I do wrong?
Don’t worry, a little cracking is common, especially for a first-time roll cake baker! Ensure your cake isn’t over-baked, as this can make it brittle. Rolling it while it’s still warm is crucial – it makes the cake more pliable. You can also try dusting the parchment paper with a bit of cocoa powder before baking, which can help prevent sticking.
Q: Are there any nut-free variations for this recipe?
While the peanut butter is a star, you can adapt this recipe for nut allergies. You could substitute the peanut butter filling with a cream cheese frosting or a white chocolate ganache. For the chocolate itself, always check labels to ensure no cross-contamination if severe allergies are a concern. The chocolate flavor will still be prominent and delicious!
Peanut Butter Cup Chocolate Roll Cake
A decadent chocolate cake rolled with a creamy peanut butter filling and studded with chopped peanut butter cups.
Ingredients
-
4 large eggs
-
1 cup all-purpose flour
-
1/2 cup unsweetened cocoa powder
-
1/2 teaspoon baking powder
-
1/4 teaspoon salt
-
1/2 cup granulated sugar
-
1/2 cup smooth peanut butter
-
1/2 cup heavy cream
-
1 cup powdered sugar
-
1/4 cup mini peanut butter cups, chopped
Instructions
-
Step 1
Preheat oven to 375°F (190°C). Grease and flour a 10×15 inch jelly roll pan. Line with parchment paper and grease the parchment. -
Step 2
In a bowl, whisk together flour, cocoa powder, baking powder, and salt. Set aside. -
Step 3
In another bowl, beat eggs and granulated sugar until light and fluffy. Gradually fold in the dry ingredients until just combined. Spread batter evenly into the prepared pan. -
Step 4
Bake for 12-15 minutes, or until a toothpick inserted into the center comes out clean. Immediately invert the cake onto a clean kitchen towel dusted with powdered sugar. Peel off the parchment paper. Roll up the cake and towel together. Let cool completely. -
Step 5
In a bowl, beat smooth peanut butter and heavy cream until smooth. Gradually beat in powdered sugar until the filling is spreadable. -
Step 6
Unroll the cooled cake. Spread the peanut butter filling evenly over the cake. Sprinkle with chopped peanut butter cups. Roll up the cake tightly. Refrigerate for at least 1 hour before slicing and serving.
Important Information
Nutrition Facts (Per Serving)
It is important to consider this information as approximate and not to use it as definitive health advice.
Allergy Information
Please check ingredients for potential allergens and consult a health professional if in doubt.