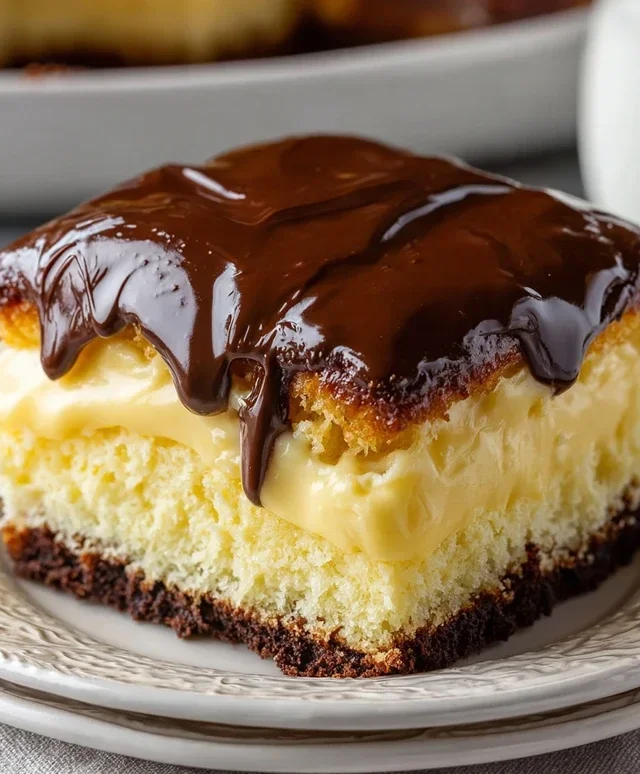
Boston Cream Poke Cake- Easy & Delicious Dessert
Boston Cream Poke Cake is a dessert dream come true for anyone who adores the classic flavors of Boston Cream Pie but craves a more accessible, delightfully moist, and spoon-worthy experience. If you’re searching for a showstopper that’s surprisingly easy to pull off, your quest ends here. This isn’t just any cake; it’s a celebration of creamy, dreamy goodness infused into every bite. What makes our Boston Cream Poke Cake so irresistible? It’s the magic that happens when a tender yellow cake is pierced with countless tiny holes, eagerly soaking up a rich, decadent custard. Then, it’s crowned with a glossy, luscious chocolate glaze that hardens just enough to provide the perfect textural contrast. It’s the ultimate comfort food, a guaranteed crowd-pleaser that tastes even better than it looks, and trust me, it looks spectacular!
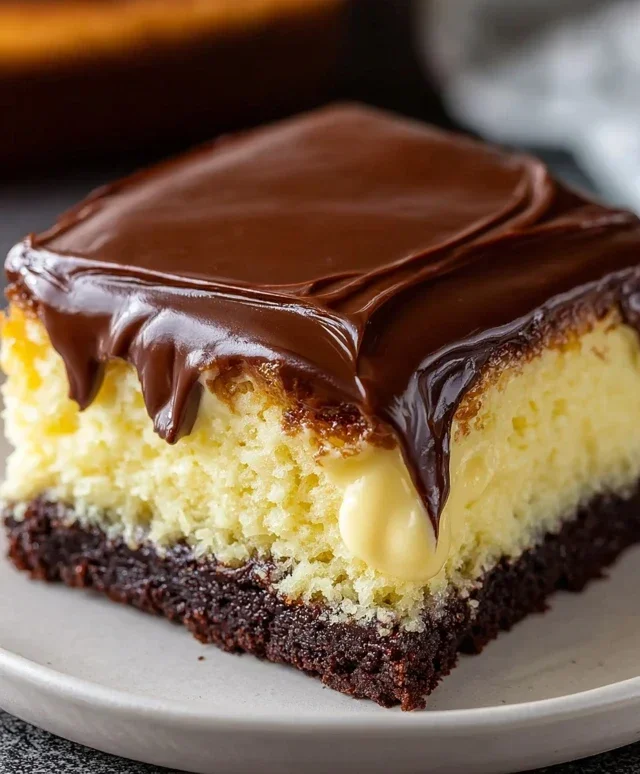
Boston Cream Poke Cake
This Boston Cream Poke Cake is a delightful and surprisingly easy dessert that brings together the best elements of a classic Boston Cream Pie and a fun, moist poke cake. Imagin extracte a tender yellow cake, infused with creamy vanilla pudding, and topped with a rich, decadent chocolate glaze. It’s the perfect crowd-pleaser for birthdays, holidays, or just because you deserve a sweet treat. The “poke” aspect comes from the holes we create in the cake, allowing the luscious pudding mixture to seep in and create an unbelievably moist and flavorful experience in every bite. Forget complicated pie crusts; this is a shortcut to pure dessert bliss!
Ingredients:
Making the Magic Happen:
Let’s get started on creating this spectacular cake!
Baking the Yellow Cake Base
First things first, we need to bake our cake. Preheat your oven to the temperature specified on your yellow cake mix box. Grease and flour a 9×13 inch baking pan. In a large bowl, prepare the cake mix according to the package directions. This typically involves adding eggs, oil, and water. Whisk everything together until it’s well combined and smooth, making sure there are no dry pockets of cake mix. Pour the batter evenly into your prepared baking pan. Bake for the time recommended on the box, or until a toothpick inserted into the center of the cake comes out clean. Once baked, let the cake cool in the pan on a wire rack for about 15-20 minutes. We want it to be cool enough to handle, but still warm enough for the pudding to really soak in.
Creating the Pudding Infusion
While the cake is cooling slightly, it’s time to prepare our creamy pudding filling. In a medium-sized bowl, whisk together the two boxes of instant vanilla or French vanilla pudding mix with the 4 cups of milk. Whisk vigorously for about 2 minutes, or until the pudding starts to thicken. It’s important to use instant pudding here for speed and ease. French vanilla pudding will give a slightly richer, more complex flavor, but regular vanilla is absolutely delicious too. Let the pudding sit for about 5 minutes to fully set up. It should be thick and spoonable at this point.
The “Poke” and Pour
This is where the fun really begin extracts! Once the cake has cooled for that initial 15-20 minutes, it’s time to create the “poke.” Take the handle of a wooden spoon, a skewer, or even the end of a chopstick and poke holes all over the surface of the warm cake. Don’t be shy – make plenty of holes, spacing them about an inch apart. The more holes you make, the more pudding will seep into the cake, resulting in an even more incredibly moist dessert. Now, gently pour the prepared pudding mixture evenly over the top of the cake, allowing it to fill all those newly created holes. You might need to use your spoon or spatula to gently coax some of the pudding into the deeper holes, especially around the edges.
Chill Out and Let it Mingle
Now comes the hardest part: waiting! Cover the pan tightly with plastic wrap and refrigerate the cake for at least 4 hours, or preferably overnight. This chilling time is crucial for several reasons. Firstly, it allows the pudding to fully set and meld with the cake, creating that signature moist texture. Secondly, it allows the flavors to deepen and develop. The pudding will continue to work its magic, infusing every corner of the cake. Don’t rush this step; the longer it chills, the better the results will be!
The Chocolate Crown Jewel
After the cake has had ample time to chill and the pudding has set beautifully, it’s time for the glorious chocolate topping. In a microwave-safe bowl, place the entire 16 ounce tub of chocolate frosting. Microwave it in 30-second intervals, stirring between each interval, until the frosting is smooth and pourable. Be careful not to overheat it, as it can scorch easily. Alternatively, you can gently melt it in a double boiler on the stovetop. Once smooth, pour the warm chocolate frosting over the chilled cake and pudding layer. Use an offset spatula or the back of a spoon to spread the frosting evenly across the top, creating a beautiful, glossy finish. You can create swirls or a smooth surface, whatever your heart desires!
Serve and Savor
Once the chocolate frosting is spread, you can either serve the cake immediately or refrigerate it for a little longer to let the frosting set up slightly. To serve, simply cut the cake into squares. You’ll notice the beautiful layers of moist cake, creamy pudding, and rich chocolate. This Boston Cream Poke Cake is best served chilled. Prepare yourself for rave reviews – this cake is always a showstopper! Enjoy every decadent bite!
Conclusion:
There you have it – your guide to crafting a truly spectacular Boston Cream Poke Cake! This recipe is an absolute winner because it combines the beloved flavors of classic Boston Cream Pie with the irresistible texture of a moist poke cake. The interplay of fluffy cake, rich pudding filling, and decadent chocolate ganache creates a dessert that’s both comforting and incredibly impressive. It’s surprisingly simple to make, making it a perfect choice for both novice bakers and seasoned pros looking for a crowd-pleasing treat. Imagin extracte the delight on your guests’ faces as they discover the creamy pockets hidden within each slice!
For serving, this Boston Cream Poke Cake is fantastic on its own, but it also pairs wonderfully with a dollop of fresh whipped cream or a scoop of vanilla bean ice cream. When it comes to variations, don’t be afraid to get creative! You could try using a different flavor of cake mix, like yellow or even a subtle almond, or experiment with different pudding flavors like cheesecake or white chocolate. Adding some fresh berries to the top just before serving can also add a lovely burst of freshness. I truly encourage you to give this recipe a try – it’s guaranteed to become a new favorite!
Frequently Asked Questions:
Can I make this cake ahead of time?
Absolutely! In fact, making this Boston Cream Poke Cake ahead of time is highly recommended. Allowing the cake to chill for at least 4 hours, or preferably overnight, lets the pudding and ganache fully meld with the cake, resulting in an even more moist and flavorful dessert. Just be sure to cover it tightly before refrigerating.
What kind of chocolate should I use for the ganache?
For the best flavor and texture in your ganache, I recommend using good quality semi-sweet or dark chocolate chips. You can also chop up a good quality chocolate bar. Avoid using milk chocolate as it can make the ganache too sweet and soft. The richness of semi-sweet or dark chocolate perfectly balances the sweetness of the cake and pudding.
My cake didn’t absorb all the pudding. What did I do wrong?
Don’t worry, this can happen! Sometimes, if the cake is very dense or if you haven’t poked enough holes, all the pudding might not absorb immediately. The important thing is that the pudding is in the holes. As it chills, it will continue to soak in. You can also gently spoon any excess pudding from the surface into the larger holes. The flavor will still be incredible!
Boston Cream Poke Cake
A delicious and easy poke cake inspired by the classic Boston Cream Pie, featuring a moist yellow cake soaked in pudding and topped with chocolate frosting.
Ingredients
-
15.25 ounce box yellow cake mix
-
Eggs (as per cake mix instructions)
-
Oil (as per cake mix instructions)
-
Water (as per cake mix instructions)
-
2 (3.4 ounce) boxes instant vanilla pudding
-
4 cups milk
-
16 ounce tub chocolate frosting
Instructions
-
Step 1
Prepare the yellow cake according to the box directions using the specified eggs, oil, and water. Pour batter into a greased 9×13 inch baking pan. -
Step 2
Bake the cake as directed on the box. Once baked, let it cool slightly in the pan. -
Step 3
While the cake is still warm, poke holes all over the top using the handle of a wooden spoon or a fork. -
Step 4
In a separate bowl, whisk together the two boxes of instant vanilla pudding and 4 cups of milk until thickened. Pour this pudding mixture evenly over the poked cake, allowing it to seep into the holes. -
Step 5
Cover the cake and refrigerate for at least 4 hours, or until the pudding is set. -
Step 6
Once chilled and set, spread the 16 ounce tub of chocolate frosting evenly over the top of the cake.
Important Information
Nutrition Facts (Per Serving)
It is important to consider this information as approximate and not to use it as definitive health advice.
Allergy Information
Please check ingredients for potential allergens and consult a health professional if in doubt.