Triple Layer Chocolate Mint Squares Recipe – Delicious Treat
Triple-layer chocolate mint squares are the ultimate treat for any chocolate lover seeking a refreshing twist. There’s something incredibly satisfying about the perfect balance of rich, decadent chocolate and cool, invigorating mint. These triple-layer chocolate mint squares deliver just that, offering a symphony of textures and flavors in every bite. Imagin extracte a fudgy chocolate base, a creamy mint filling, and a smooth chocolate ganache topping – it’s a dream come true for anyone with a sweet tooth. What makes these particular triple-layer chocolate mint squares so special is their sophisticated yet incredibly approachable nature. They’re elegant enough for a special occasion but simple enough to whip up for a weeknight indulgence. Get ready to impress yourself and anyone lucky enough to share them!
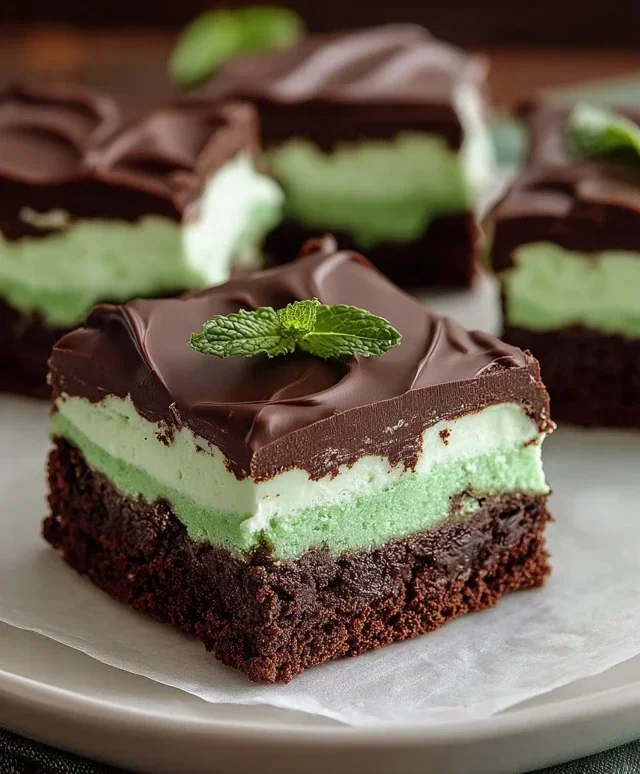
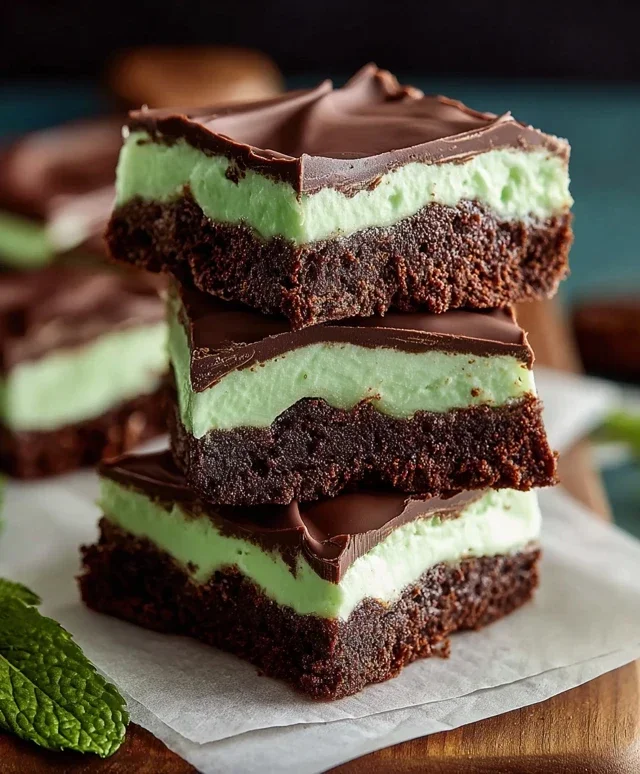
Triple-Layer Chocolate Mint Squares
There’s something undeniably luxurious about a perfectly crafted chocolate dessert. And when you combine rich chocolate with the refreshing zing of mint, you’ve got a winning combination that’s sure to impress. These Triple-Layer Chocolate Mint Squares are exactly that – a decadent treat that balances deep chocolate flavor with a cool, minty finish, all in a delightful layered format. This recipe might seem a little involved, but trust me, each step is worth it for the incredible payoff. We’re building layers of flavor and texture, starting with a fudgy chocolate base, moving to a creamy mint frosting, and finishing with a smooth chocolate ganache. Get ready to make a dessert that’s as beautiful as it is delicious.
Ingredients:
Fudgy Chocolate Base
Our journey begin extracts with creating the foundation of these incredible squares: a rich, fudgy chocolate brownie-like base. This layer is intensely chocolatey and perfectly dense, providing a fantastic contrast to the lighter mint frosting that will follow.
1. Preheat your oven to 350°F (175°C). Grease and flour a 9×13 inch baking pan, or line it with parchment paper, leaving an overhang on the sides to help lift the finished bars out easily. This makes cleanup a breeze and ensures your squares don’t stick. In a medium saucepan over low heat, melt 1 cup of salted butter along with 4 oz. of semi-sweet chocolate chips. Stir constantly until the chocolate is completely melted and the mixture is smooth. Be patient here; we don’t want to scorch the chocolate. Once melted, remove the pan from the heat and stir in 2 cups of granulated sugar and 2 teaspoons of vanilla extract. The mixture should be well combined and slightly glossy.
2. In a separate bowl, whisk together 1 ½ cups of all-purpose flour and 4 large eggs until just combined. Don’t overmix the flour; we want a tender base. Gradually add the wet chocolate mixture to the dry ingredients, stirring gently until no streaks of flour remain. Again, resist the urge to overmix. Pour this rich chocolate batter into your prepared baking pan, spreading it evenly. Bake for 25-30 minutes, or until a wooden skewer inserted into the center comes out with moist crum extractbs attached, not wet batter. We’re aiming for a fudgy texture, so don’t overbake it. Let this chocolate base cool completely in the pan on a wire rack. This is crucial before adding the next layer to prevent the frosting from melting.
Creamy Mint Frosting
Now for the star of the show – the vibrant and delicious mint frosting! This layer provides a refreshing counterpoint to the deep chocolate below, and the green hue makes these squares visually striking.
3. While the chocolate base is cooling, we’ll prepare the mint frosting. In a large bowl, cream together ¾ cup of softened salted butter and 3 cups of powdered sugar. Start on low speed and gradually increase to medium-high, beating until the mixture is light and fluffy. This might take a few minutes, and scraping down the sides of the bowl periodically will ensure everything is incorporated evenly. This step is key for a smooth and creamy frosting.
4. To the butter and sugar mixture, add 1 tablespoon of heavy whipping cream, 1 teaspoon of peppermint extract, and 10 drops of green food coloring. Begin extract mixing on low speed to avoid a cloud of powdered sugar, then increase to medium-high and beat until the frosting is smooth, creamy, and a lovely shade of green. If the frosting seems too thick, you can add another teaspoon of heavy whipping cream, a little at a time, until it reaches your desired consistency. If it’s too thin, add a tablespoon or two more of powdered sugar. Once the chocolate base is completely cool, spread this mint frosting evenly over the top. Use an offset spatula for a smooth, professional finish.
Decadent Chocolate Ganache Topping
The final layer brings everything together with a glossy, rich chocolate ganache. It’s simple to make but adds a touch of elegance and another dimension of chocolate flavor.
5. Once the mint frosting has set slightly (you can pop the pan in the refrigerator for about 15-20 minutes to speed this up, but it’s not strictly necessary), it’s time for the ganache. In a heatproof bowl, combine 3 cups of semi-sweet chocolate chips and 2 tablespoons of butter. In a small saucepan, heat ½ cup of heavy whipping cream over medium heat until it just begin extracts to simmer around the edges. Do not let it boil. Pour the hot cream over the chocolate chips and butter. Let it sit undisturbed for about 5 minutes to allow the heat to melt the chocolate and butter. Then, gently whisk the mixture starting from the center and working your way outwards until it’s completely smooth and glossy. This is your ganache.
6. Carefully pour the warm ganache over the mint frosting layer, tilting the pan gently to spread it evenly. You want a nice, smooth surface. For the best results, allow the ganache to set completely. This can take a couple of hours at room temperature, or you can speed it up by placing the pan in the refrigerator for about 1-2 hours until the ganache is firm to the touch. Once set, use a sharp knife to cut the Triple-Layer Chocolate Mint Squares into your desired portions. For cleaner cuts, you can run your knife under hot water and dry it between each slice. Enjoy these delightful, layered treats!
Conclusion:
I hope you’ve enjoyed learning how to create these incredible triple-layer chocolate mint squares! This recipe truly is a winner because it offers a delightful trifecta of textures and flavors. The rich, decadent chocolate brownie base provides a satisfying chew, the creamy, cool mint layer is refreshing and light, and the glossy chocolate ganache topping ties it all together perfectly. It’s the ultimate treat for any chocolate and mint lover, and I’m confident you’ll find it as irresistible as I do. These squares are fantastic for parties, holidays, or just a special afternoon indulgence. Try serving them chilled for an even more pronounced minty kick, or at room temperature for a softer bite. Don’t hesitate to experiment with variations – perhaps a swirl of white chocolate ganache on top or a sprinkle of crushed peppermint candies for extra flair? Give these triple-layer chocolate mint squares a try; I promise you won’t be disappointed!
Frequently Asked Questions:
Can I make these triple-layer chocolate mint squares ahead of time?
Absolutely! In fact, they often taste even better when they’ve had a chance to chill and the flavors meld. You can make them a day or two in advance and store them in an airtight container in the refrigerator. Just allow them to come to room temperature for about 15-20 minutes before serving for the best texture.
What if I don’t have peppermint extract? Can I use spearmint?
While peppermint extract offers that classic, crisp mint flavor often associated with chocolate mint, spearmint extract can be used as a substitute. However, be aware that spearmint has a slightly sweeter and less intense flavor. You might want to start with a little less spearmint extract and taste as you go to achieve your desired level of mintiness.
How should I store any leftover chocolate mint squares?
Store any leftover triple-layer chocolate mint squares in an airtight container in the refrigerator. They will keep well for up to 3-4 days. Because of the creamy mint layer, refrigeration is essential to maintain their quality and freshness.
Triple-Layer Chocolate Mint Squares
Decadent chocolate mint squares featuring a fudgy brownie base, a creamy mint filling, and a rich chocolate ganache topping. Perfect for any chocolate and mint lover.
Ingredients
-
1 cup salted butter
-
4 oz. semi-sweet chocolate chips
-
2 cups granulated sugar
-
2 teaspoons vanilla extract
-
1 ½ cups all-purpose flour
-
4 large eggs
-
¾ cup salted butter, softened
-
3 cups powdered sugar
-
1 tablespoon heavy whipping cream
-
1 teaspoon peppermint extract
-
10 drops green food coloring
-
3 cups semi-sweet chocolate chips
-
2 tablespoons butter
-
½ cup heavy whipping cream
Instructions
-
Step 1
Preheat oven to 350°F (175°C). Line an 8×8 inch baking pan with parchment paper, leaving an overhang on the sides. -
Step 2
Melt 1 cup salted butter and 4 oz. semi-sweet chocolate chips in a heatproof bowl set over a saucepan of simmering water. Stir until smooth. Remove from heat. -
Step 3
In a large bowl, whisk together 2 cups granulated sugar and 2 teaspoons vanilla extract with the melted chocolate mixture. Beat in 4 large eggs one at a time until well combined. Fold in 1 ½ cups all-purpose flour. -
Step 4
Spread the batter evenly into the prepared baking pan. Bake for 30 minutes, or until a toothpick inserted into the center comes out with moist crumbs. -
Step 5
While the brownies bake, prepare the mint filling. In a large bowl, beat ¾ cup softened salted butter until creamy. Gradually add 3 cups powdered sugar, alternating with 1 tablespoon heavy whipping cream. Mix in 1 teaspoon peppermint extract and 10 drops green food coloring until smooth and green. Spread evenly over the warm brownies. -
Step 6
To make the ganache, melt 3 cups semi-sweet chocolate chips and 2 tablespoons butter with ½ cup heavy whipping cream in a heatproof bowl over simmering water. Stir until smooth and glossy. Pour over the mint layer and spread evenly. -
Step 7
Let the squares cool completely in the pan at room temperature, then refrigerate for at least 2 hours before cutting into squares.
Important Information
Nutrition Facts (Per Serving)
It is important to consider this information as approximate and not to use it as definitive health advice.
Allergy Information
Please check ingredients for potential allergens and consult a health professional if in doubt.