Easy Homemade Pizza Rolls – Delicious Bites
Pizza rolls are a culinary masterpiece that ignite pure joy in my taste buds. Who can resist the allure of these delightful little pockets, brimming with molten cheese and savory toppings, all encased in a perfectly chewy dough? I know I can’t! It’s that irresistible combination of convenience and comfort food magic that makes pizza rolls an enduring favorite for kids and adults alike. They’re the ultimate appetizer for game nights, a quick and satisfying snack, or even a fun dinner option that always brings smiles. What truly sets these homemade pizza rolls apart is the ability to customize them to your heart’s content. Forget the frozen aisle; we’re about to dive into creating your very own, superior version of these beloved pizza rolls, guaranteeing a burst of flavor with every single bite.
Get Ready for the Ultimate Homemade Pizza Rolls Experience!
Let’s Create Some Magic!
Pizza Rolls: Your New Favorite Appetizer!
Tired of the same old snacks? Get ready to revolutionize your appetizer game with these irresistible Pizza Rolls! They’re like mini pizza pies, all rolled up into a perfectly poppable bite. Whether you’re hosting a party, looking for a fun family activity, or just craving something cheesy and delicious, these pizza rolls are guaranteed to be a hit. Plus, they’re surprisingly easy to make, making them perfect for begin extractners and seasoned chefs alike. Imagin extracte the delighted faces of your guests as they bite into warm, gooey, savory goodness. This recipe is a crowd-pleaser that will leave everyone asking for seconds. We’ve included some fantastic vegetables to sneak in some goodness, but feel free to customize with your favorite toppings. Get ready to impress with this simple yet spectacular treat!
Ingredients:
Preparing Your Pizza Roll Masterpiece
Let’s get started on crafting these delightful pizza rolls! The key to fantastic pizza rolls is in the preparation of your fillings and the careful assembly. First things first, preheat your oven to 400 degrees Fahrenheit (200 degrees Celsius). This ensures that your pizza rolls get that perfect golden-brown crust and melty interior. While the oven heats up, let’s get our ingredients prepped and ready to go.
Sautéing the Veggies for Maximum Flavor
To really elevate the flavor of your pizza rolls, we’re going to lightly sauté the vegetables. In a skillet over medium heat, add a tiny drizzle of olive oil (just a teaspoon or so). Once the oil is shimmering, add your finely diced onions and cook until they become translucent and slightly softened, about 3-4 minutes. This process mellows out their sharp bite and brings out their natural sweetness. Next, add the finely diced bell peppers and mushrooms. Continue to cook, stirring occasionally, until the vegetables are tender-crisp, which should take another 5-7 minutes. We don’t want them to be mushy, just perfectly cooked. Once they’re ready, remove the skillet from the heat and set aside. This step ensures that your vegetables are tender and flavorful, not raw and crunchy, within your pizza rolls.
Assembling the Perfect Pizza Roll
Now for the fun part: assembly! Unroll your pizza dough onto a lightly floured surface. If you’re using a dough ball, roll it out into a rectangle, about 12×16 inches. The thickness should be about ¼ inch. Spread your pizza sauce evenly over the dough, leaving about a ½ inch border around the edges. This border will help seal the rolls later. Don’t go too heavy on the sauce, or your rolls might get soggy.
Next, evenly distribute your cooked vegetables over the sauce. Then, sprinkle the shredded mozzarella cheese all over the vegetables. Finally, layer the beef pepperoni slices (or plant-based beef pepperoni) on top of the cheese. Make sure to distribute them evenly so you get a bit of beef pepperoni in every bite.
Rolling and Slicing for Perfect Portions
Carefully begin extract to roll up the dough, starting from one of the longer sides. Roll it up tightly, like you would a jelly roll or cinnamon roll. As you roll, try to keep the fillings contained. Once you have a log, pinch the seam to seal it shut. This is crucial to prevent any delicious filling from escaping during baking.
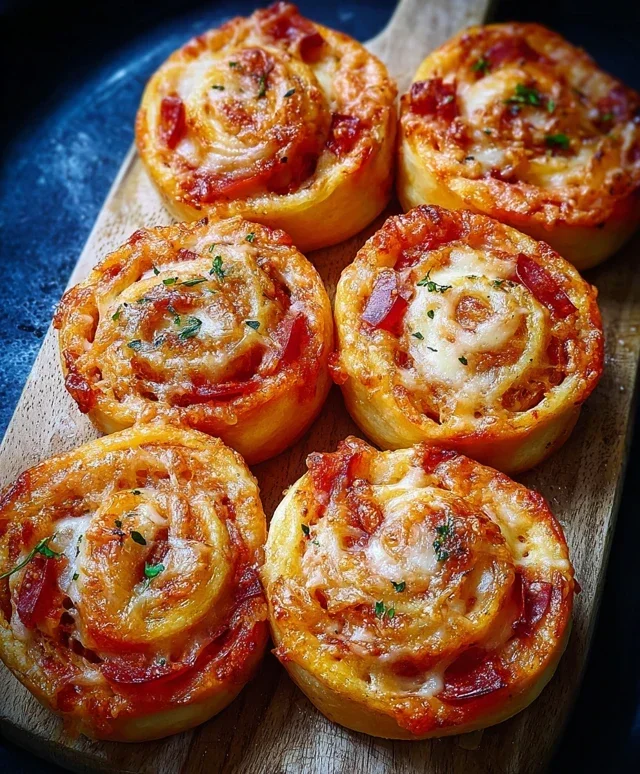
Now, it’s time to slice your log into individual pizza rolls. Using a sharp knife, cut the log into 1-inch thick pieces. For best results, make sure your knife is sharp so you get clean cuts. You should aim for about 12-16 rolls, depending on how thick you slice them. Place your sliced pizza rolls, cut-side down, onto a baking sheet lined with parchment paper. Leave a little space between each roll as they will expand slightly as they bake.
Baking to Golden Perfection
Once your pizza rolls are arranged on the baking sheet, it’s time to add the finishing touch. In a small bowl, combine the melted butter with the minced garlic and optional parsley. Brush this garlic butter mixture generously over the tops of each pizza roll. This will give them a beautiful golden color and an extra burst of flavor.
Place the baking sheet into your preheated oven. Bake for 12-15 minutes, or until the pizza rolls are golden brown and the cheese is melted and bubbly. Keep an eye on them, as ovens can vary. Once they’re done, carefully remove them from the oven.
Serving Your Delicious Creations
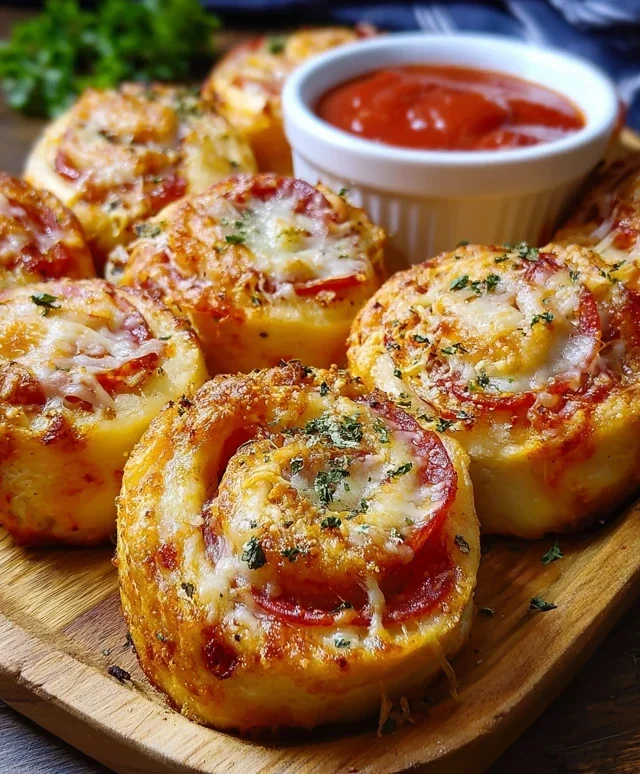
Let your pizza rolls cool for a few minutes on the baking sheet before transferring them to a serving platter. This allows the cheese to set up a bit, making them easier to handle. Serve them warm with extra pizza sauce for dipping. A sprinkle of grated Parmesan cheese over the top just before serving adds a lovely salty finish. Enjoy your homemade pizza rolls – they’re a guaranteed crowd-pleaser!
Conclusion:
And there you have it – your guide to making absolutely delicious homemade pizza rolls! I truly believe this recipe is fantastic because it offers that irresistible pizza flavor in a fun, bite-sized package that’s perfect for snacking, parties, or even a quick and satisfying meal. The beauty of these pizza rolls lies in their versatility; you can customize them with your favorite toppings and fillings. Whether you’re a begin extractner baker or a seasoned pro, this recipe is approachable and rewarding. Don’t be afraid to experiment with different cheeses, sauces, and fillings to make them your own!
These pizza rolls are a dream to serve. They’re wonderful on their own, but even better when paired with a marinara dipping sauce for that classic pizza experience. For a more substantial meal, consider serving them alongside a fresh green salad or some garlic breadsticks. And the variations are endless! Think of adding cooked Italian sausage, beef pepperoni, mushrooms, onions, or even a sprinkle of red pepper flakes for a spicy kick. The possibilities are truly limited only by your imagin extractation. I strongly encourage you to give this pizza roll recipe a try – I’m confident you’ll love the results!
Frequently Asked Questions:
Can I make these pizza rolls ahead of time?
Yes, absolutely! You can prepare the pizza rolls, wrap them tightly, and refrigerate them for up to 24 hours before baking. For longer storage, you can freeze the unbaked pizza rolls on a baking sheet until solid, then transfer them to a freezer-safe bag. Bake them directly from frozen, adding a few extra minutes to the baking time.
What’s the best way to reheat leftover pizza rolls?
The best way to reheat pizza rolls is in the oven or a toaster oven at around 350°F (175°C) until they are heated through and the crust is crispy again. Microwaving can make them a bit soggy, so I generally recommend avoiding it if you want that ideal texture.
Pizza Rolls
Delicious homemade pizza rolls packed with classic pizza flavors, perfect for snacking or a fun meal.
Ingredients
-
1 tube Pillsbury pizza dough or store-bought pizza dough ball
-
1 ½ cups beef pepperoni slices
-
1 ½ cups mozzarella cheese, shredded
-
1 cup pizza sauce
-
½ cup mushrooms, finely diced
-
½ cup onions, finely diced
-
½ cup bell peppers, finely diced
-
¼ cup salted butter, melted
-
1 clove garlic, minced
-
1 teaspoon parsley, dried
-
Pizza sauce, for dipping
-
Parmesan cheese, for garnish
Instructions
-
Step 1
Preheat your oven to 400°F (200°C). Line a baking sheet with parchment paper. -
Step 2
Unroll the pizza dough onto a lightly floured surface. If using a dough ball, stretch or roll it into a rectangle about 10×15 inches. -
Step 3
Spread the pizza sauce evenly over the dough, leaving a small border around the edges. -
Step 4
Sprinkle the shredded mozzarella cheese over the sauce. Then, evenly distribute the pepperoni slices, diced mushrooms, onions, and bell peppers. -
Step 5
Carefully roll up the dough tightly, starting from the long edge, to form a log. Pinch the seam to seal. -
Step 6
Slice the log into 1-inch thick rolls. Place the rolls cut-side up on the prepared baking sheet. -
Step 7
In a small bowl, mix the melted butter with minced garlic and parsley. Brush this mixture over the tops of the pizza rolls. -
Step 8
Bake for 15-20 minutes, or until golden brown and the cheese is melted and bubbly. -
Step 9
Serve hot with extra pizza sauce for dipping and a sprinkle of Parmesan cheese if desired.
Important Information
Nutrition Facts (Per Serving)
It is important to consider this information as approximate and not to use it as definitive health advice.
Allergy Information
Please check ingredients for potential allergens and consult a health professional if in doubt.