Patriotic Oreo Balls – Easy Red White Blue Treat
Patriotic Oreo Balls are more than just a sweet treat; they’re a vibrant explosion of flavor and festivity, perfect for any celebration where red, white, and blue reign supreme! I absolutely adore these little bites because they’re incredibly easy to make, yet they deliver such a delightful “wow” factor. The magic happens when crushed Oreo cookies and creamy cheese blend together, forming a rich, decadent base. What truly elevates these Patriotic Oreo Balls, however, is the dazzling patriotic coating. Imagin extracte dunking those irresistible spheres into melted white chocolate, then artfully drizzling them with vibrant red and blue candy melts. They’re the ultimate crowd-pleaser, guaranteed to disappear in a flash at barbecues, Fourth of July gatherings, or any occasion demanding a touch of Americana. Get ready to impress your friends and family with these show-stopping Patriotic Oreo Balls that taste as good as they look!
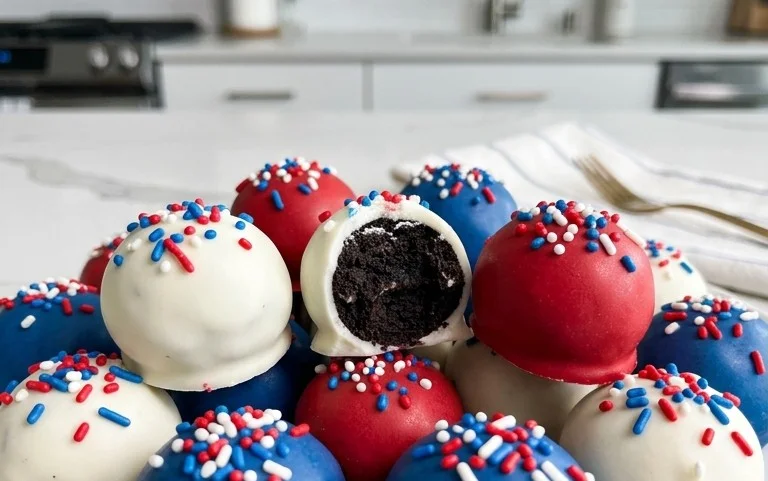
Patriotic Oreo Balls
Get ready to ignite your taste buds and deck out your dessert table with these incredibly easy and undeniably delicious Patriotic Oreo Balls! Perfect for Fourth of July barbecues, Memorial Day picnics, or any celebration where a touch of red, white, and blue is called for, these no-bake treats are a guaranteed crowd-pleaser. They’re a delightful twist on the classic Oreo ball, transformed into festive, bite-sized bundles of joy. The rich, creamy center made from crushed Oreos and cream cheese is perfectly complemented by the vibrant candy coating, creating a symphony of textures and flavors that will have everyone asking for the recipe. Don’t worry if you’re not a seasoned baker – these are so simple, anyone can make them. So gather your ingredients, put on some festive music, and let’s get started on creating these star-spangled delights!
Ingredients:
Making the Dough
The foundation of our delicious Patriotic Oreo Balls lies in a simple yet effective combination of crushed Oreos and cream cheese. This mixture, when combined, creates a dough-like consistency that is both easy to handle and incredibly rich.
Melting and Dipping
This is where the magic of red, white, and blue truly comes to life! Melting and dipping require a bit of patience and technique, but the results are worth it.
- Melt the Candy Melts: While the Oreo balls are chilling, you can begin extract melting your candy melts and white melting wafers. For the red and blue candy melts, place each color in a separate microwave-safe bowl. Heat them in the microwave in 30-second intervals, stirring well after each interval. Continue until the candy melts are smooth and fully melted. Be patient – overheating candy melts can cause them to seize or become clumpy. For the Ghirardelli white melting wafers, you can melt them in a similar fashion, or use a double boiler for a gentler melting process. Once melted, add a teaspoon of vegetable shortening or coconut oil to each bowl (especially the candy melts) and stir to achieve a smoother, more fluid consistency. This will make dipping much easier and create a glossier finish.
- Dip and Decorate: Now it’s time to transform your plain Oreo balls into festive masterpieces! Working with one color at a time (or alternating for a marbled effect), dip each chilled Oreo ball into the melted red or blue candy. Use a fork or a dipping tool to coat the entire ball, allowing any excess to drip back into the bowl. You want a nice, even coating. Carefully place the dipped ball back onto the parchment-lined baking sheet.
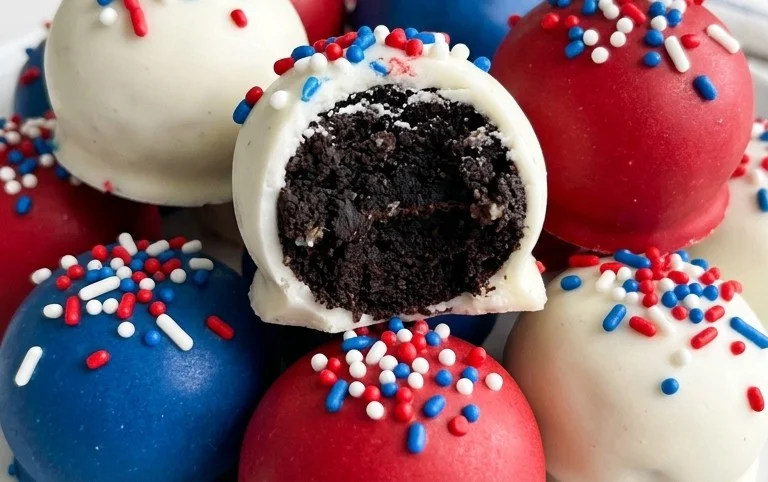
- Create the Red, White, and Blue Design: For the patriotic effect, you have a few options. You can create alternating red and blue balls. For a layered effect, dip a ball in red, let it set slightly, then dip the bottom half in white, or vice-versa. Another popular technique is to dip a ball in one color, and then drizzle the other color over it. You can also create a swirled effect by dipping in one color and then using a toothpick to gently swirl in a bit of the other color before it sets.
- Add the Stars: While the candy coating is still wet, immediately sprinkle the white star confetti sprinkles over the top of the dipped balls. The sprinkles will adhere to the melted candy, creating a beautiful starry effect. Work quickly with the sprinkles, as the candy coating will begin extract to set.
- Allow to Set: Once all your Oreo balls are dipped and decorated, let them sit undisturbed at room temperature until the candy coating is completely set and hardened. This can take anywhere from 30 minutes to an hour, depending on the temperature of your room. You can speed up the process by placing the baking sheet back into the refrigerator for about 10-15 minutes, but be mindful that this can sometimes cause condensation on the coating if taken out too quickly.
-
1 lb 2.12 oz Family Size package Oreo Cookies
-
8 ounce block cream cheese, softened to room temperature
-
12 ounce bag red candy melts
-
12 ounce bag blue candy melts
-
⅓ cup Ghirardelli white melting wafers
-
White star confetti sprinkles for topping
-
Step 1
Crush the Oreo cookies into fine crumbs using a food processor or by placing them in a resealable bag and crushing with a rolling pin. -
Step 2
In a medium bowl, combine the Oreo cookie crumbs with the softened cream cheese. Mix until well combined and a dough-like consistency is formed. -
Step 3
Roll the mixture into small balls, about 1 inch in diameter. Place the balls on a parchment-lined baking sheet and freeze for about 15-20 minutes until firm. -
Step 4
Melt the red candy melts and blue candy melts separately according to package directions, typically in the microwave in 30-second intervals, stirring in between. Melt the white melting wafers separately. -
Step 5
Dip the chilled Oreo balls into the melted candy melts, using a fork or toothpick to help coat them evenly. For a patriotic look, alternate dipping in red and blue melts. You can drizzle with white melted wafers for extra design. -
Step 6
Immediately after dipping, sprinkle with white star confetti sprinkles while the candy coating is still wet. Place the decorated balls back on the parchment-lined baking sheet. -
Step 7
Allow the candy melts to set completely. Once firm, transfer the Patriotic Oreo Balls to an airtight container and store in the refrigerator.
Serving and Storing
Once your Patriotic Oreo Balls have fully set, they are ready to be enjoyed! These treats are best served at room temperature, as the cream cheese filling will be at its creamiest. They are perfect for a dessert platter, a party favor, or simply a sweet treat to enjoy with a cold glass of milk. If you have any leftovers (which is unlikely!), store them in an airtight container at room temperature for up to a week. Avoid storing them in the refrigerator for extended periods, as this can affect the texture of the candy coating. Enjoy your delicious and festive creations!
Conclusion:
These Patriotic Oreo Balls are an absolute showstopper, perfect for any holiday gathering or just because you’re feeling festive! They’re incredibly easy to whip up, making them a fantastic activity for all ages. The simple combination of crushed Oreos, cream cheese, and a sweet chocolate coating results in a decadent yet delightful treat that disappears in a flash. Their vibrant red, white, and blue colors are sure to impress your guests and add a pop of patriotic flair to any dessert table. I truly encourage you to give these a try – you won’t be disappointed!
When it comes to serving, these Patriotic Oreo Balls are wonderfully versatile. They’re perfect as a standalone treat, but they also make a charming addition to a dessert platter alongside other baked goods. For a truly festive presentation, arrange them on a blue or white platter and sprinkle with extra edible glitter or sprinkles.
Looking for ways to customize? You can experiment with different colors of candy melts for the coating or even add a touch of peppermint extract to the Oreo mixture for a subtle twist. Consider dipping some in white chocolate and others in red or blue for even more visual appeal. The possibilities are truly endless when it comes to making these your own.
Frequently Asked Questions:
Can I make these ahead of time?
Absolutely! Patriotic Oreo Balls can be made up to a week in advance and stored in an airtight container in the refrigerator. This makes them an excellent make-ahead option for parties, saving you precious time on the day of your event.
What kind of Oreos should I use?
Classic chocolate Oreos are the standard and work beautifully. However, you can also experiment with golden Oreos for a lighter base, or even seasonal flavors if they align with your patriotic theme.
How should I store leftovers?
Leftover Patriotic Oreo Balls should be stored in an airtight container in the refrigerator. They will stay fresh for about a week, though I doubt you’ll have many leftovers once people get a taste of these delicious treats!
Patriotic Oreo Balls
Festive and easy-to-make Oreo balls perfect for Fourth of July celebrations or any patriotic gathering. These no-bake treats combine crushed Oreos, cream cheese, and a colorful candy melt coating adorned with white star sprinkles.
Ingredients
Instructions
Important Information
Nutrition Facts (Per Serving)
It is important to consider this information as approximate and not to use it as definitive health advice.
Allergy Information
Please check ingredients for potential allergens and consult a health professional if in doubt.