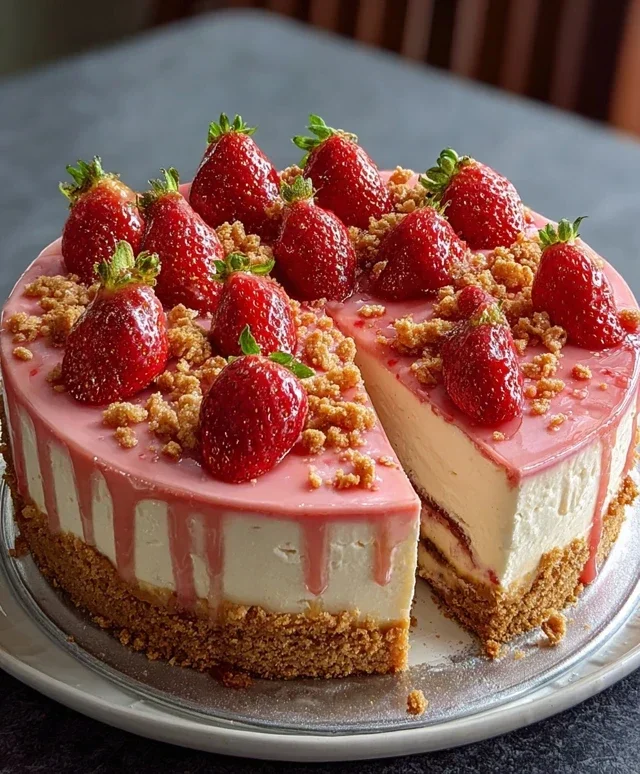
Pink Strawberry Crunch Cheesecake Recipe-Easy Dessert
Pink Strawberry Crunch Cheesecake: prepare to fall head over heels for this utterly divine dessert. We all have those cravings, that undeniable pull towards something sweet, creamy, and just a little bit decadent, and this Pink Strawberry Crunch Cheesecake delivers on every single front. Imagin extracte the impossibly smooth, tangy cheesecake filling, swirled with vibrant, naturally-hued strawberry goodness, all nestled on a buttery, crunchy grabeef ham cracker crust. It’s a textural masterpiece, a symphony of flavors that dances on your palate. What makes this particular Pink Strawberry Crunch Cheesecake so special? It’s the perfect balance – not too sweet, not too tart, with that delightful crunch providing a satisfying counterpoint to the silken cheesecake. It’s the kind of dessert that brings smiles to faces and leaves everyone asking for seconds, and trust me, you’ll want to make it again and again.
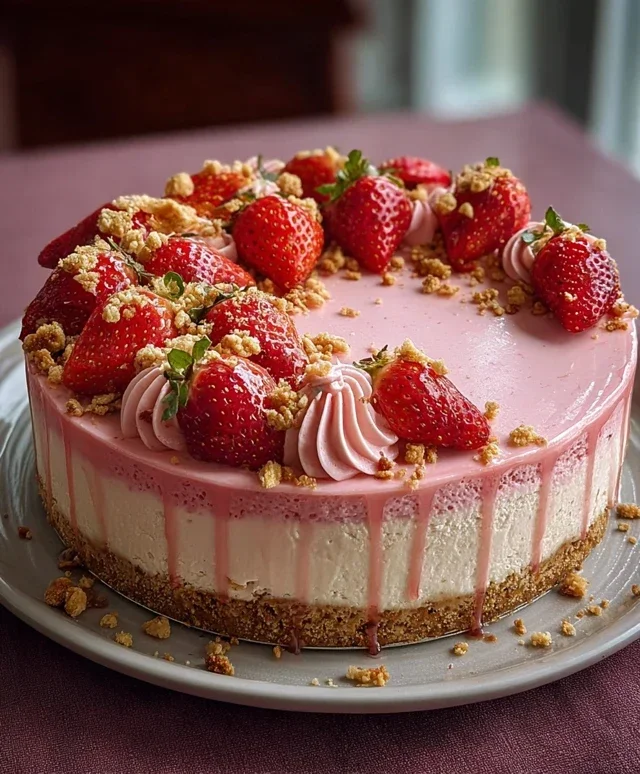
Pink Strawberry Crunch Cheesecake
Get ready to indulge in a dessert that’s as beautiful as it is delicious! This Pink Strawberry Crunch Cheesecake is a showstopper, featuring a vibrant pink hue, a delightful strawberry crunch topping, and that signature creamy cheesecake filling we all adore. It’s perfect for celebrations, a special treat, or simply when you crave something utterly delightful. The combination of the sweet, slightly tart strawberry flavor with the rich, velvety cheesecake is simply divine. And that crunchy topping? It adds a fantastic textural contrast that elevates every bite. Let’s get started on creating this masterpiece!
Ingredients:
For the Crust:
The base of any good cheesecake is a sturdy and flavorful crust, and this one is no exception. We’re using Golden Oreos for a slightly sweeter, vanilla-kissed crunch that pairs perfectly with the strawberry filling.
1. First, let’s prepare our crust. Take your 20 Golden Oreos and crush them into fine crum extractbs. You can do this by pulsing them in a food processor until they resemble sand, or by placing them in a sturdy zip-top bag and crushing them with a rolling pin. This makes for a wonderfully fine and even texture. In a medium bowl, combine the crushed Golden Oreos with the 3 tablespoons of melted butter. Stir until all the crum extractbs are moistened and the mixture holds together when squeezed. This is your base, and it should feel like damp sand.
2. Press this mixture firmly and evenly into the bottom of a 9-inch springform pan. Use the bottom of a glass or a flat measuring cup to really pack it down. This ensures a solid crust that won’t crum extractble when you slice the cheesecake. For an extra touch, you can press some of the mixture slightly up the sides of the pan, about half an inch. Place the prepared crust in the freezer while you work on the filling. This will help it set up and become nice and firm.
For the Strawberry Cheesecake Filling:
This is where the magic happens, transforming simple ingredients into a luscious, creamy dream. The addition of strawberry Jell-O powder and extract will give it a beautiful pink hue and an intense strawberry flavor without making it too jiggly like a Jell-O dessert.
3. Now, let’s make the star of the show: the cheesecake filling. In a large bowl, beat the softened cream cheese with the granulated sugar until it’s completely smooth and creamy. Make sure your cream cheese is truly softened – this is crucial for avoiding lumps. You can do this by leaving it on the counter for about an hour or two, or by gently microwaving it for very short intervals.
4. Next, beat in the 2 large eggs, one at a time, mixing just until each egg is incorporated. Be careful not to overmix at this stage, as too much air can cause the cheesecake to crack. Stir in the vanilla extract and the ½ cup of sour cream. The sour cream adds a wonderful tang and moisture to the filling, making it extra smooth and rich.
5. Now for the strawberry punch! Add the 2 tablespoons of strawberry Jell-O powder and the 1 tablespoon of strawberry extract to the cream cheese mixture. If you’re using fresh strawberry purée for an extra boost of color and flavor, gently fold it in now. Remember, the Jell-O powder is key for both color and a subtle, yet distinct, strawberry flavor profile. If you desire a more vibrant pink, you can add that single drop of pink food coloring here, but the Jell-O and purée should provide a lovely hue on their own. Ensure everything is just combined; overmixing can introduce too much air.
For the Strawberry Whipped Cream Topping:
This light and airy topping provides a delightful contrast to the dense cheesecake, and it adds another layer of strawberry goodness.
6. To create the delightful strawberry whipped cream topping, begin extract by whipping the 1 cup of heavy whipping cream in a clean, dry bowl with an electric mixer on medium-high speed until it starts to thicken. Gradually add the 1 cup of powdered sugar and the 2 tablespoons of milk. Continue whipping until stiff peaks form. Stiff peaks mean that when you lift the beaters, the cream will hold its shape and stand straight up. This ensures your topping will be light and fluffy.
7. Stir in the 1 teaspoon of strawberry extract and, if you’re using it, that single drop of pink food coloring for an extra rosy blush. Whip for another few seconds to fully incorporate. Be careful not to over-whip, or you’ll end up with butter!
Assembly and Baking:
Now we bring it all together and bake our cheesecake to perfection.
8. Pour the prepared strawberry cheesecake filling evenly over the chilled crust in the springform pan. Gently tap the pan on the counter a few times to release any air bubbles.
9. To prevent cracking, it’s best to bake the cheesecake in a water bath. Wrap the bottom of the springform pan securely with heavy-duty aluminum foil, ensuring no water can seep in. Place the wrapped pan into a larger baking dish or roasting pan. Carefully pour hot water into the larger pan, coming about halfway up the sides of the springform pan.
10. Bake in a preheated oven at 325°F (160°C) for 55-70 minutes, or until the edges are set but the center still has a slight jiggle. A little wobble in the center is perfectly fine; it will continue to set as it cools. Once baked, turn off the oven and leave the cheesecake inside with the oven door slightly ajar for another hour. This gradual cooling helps prevent cracking.
11. After the hour in the oven, remove the cheesecake from the water bath and let it cool completely on a wire rack at room temperature. Once it’s at room temperature, cover it loosely with plastic wrap and refrigerate for at least 6 hours, or preferably overnight, to allow it to fully set and for the flavors to meld.
12. Once the cheesecake is chilled and firm, carefully run a knife around the edge of the pan before releasing the sides of the springform pan. Spoon the strawberry whipped cream topping over the top of the cheesecake, spreading it gently. You can create decorative swirls or simply smooth it out. For an extra touch, consider garnishing with fresh strawberries or a sprinkle of reserved crushed Oreos. Slice and enjoy this delightful Pink Strawberry Crunch Cheesecake!
Conclusion:
And there you have it – your guide to creating the most delightful Pink Strawberry Crunch Cheesecake! This recipe is truly a winner because it strikes the perfect balance between creamy, tangy cheesecake and the sweet, vibrant burst of fresh strawberries, all elevated by that irresistible crunchy topping. It’s a dessert that looks as stunning as it tastes, making it ideal for any special occasion or just a delicious treat to brighten your day. Imagin extracte slicing into that beautiful pink swirl, revealing layers of creamy indulgence and that satisfying crunch. It’s guaranteed to impress your guests and satisfy your sweet cravings.
Serving this beauty is a joy. A simple dollop of fresh whipped cream or a few extra fresh strawberries on the side are all you need to enhance its already magnificent flavor. For variations, feel free to experiment with different types of cookie crum extractbs for the crust – grabeef ham crackers are classic, but gin extractgersnaps or even shortbread would offer a unique twist. You could also swirl in some raspberry puree for a dual-berry delight or add a hint of lemon zest to the batter for an extra layer of brightness. I truly encourage you to give this Pink Strawberry Crunch Cheesecake a try. It’s more accessible than you might think and the reward is absolutely worth it!
Frequently Asked Questions:
Can I make this cheesecake ahead of time?
Absolutely! Cheesecakes are fantastic for making ahead. In fact, chilling overnight allows the flavors to meld beautifully and the texture to set perfectly. So, feel free to bake it a day in advance and store it covered in the refrigerator.
What if I don’t have fresh strawberries?
No worries! You can certainly use good quality frozen strawberries. Thaw them completely and drain off any excess liquid before pureeing them for the swirl and topping. You might need to adjust the sugar slightly depending on their sweetness.
Pink Strawberry Crunch Cheesecake
A vibrant and delicious cheesecake with a crunchy Golden Oreo crust, creamy strawberry-infused filling, and a sweet strawberry glaze. Perfect for celebrations!
Ingredients
-
20 Golden Oreos, crushed
-
3 tbsp melted butter
-
2 tbsp strawberry Jell-O powder
-
24 oz (3 blocks) cream cheese, softened
-
¾ cup granulated sugar
-
2 large eggs
-
1 tsp vanilla extract
-
½ cup sour cream
-
1 tbsp strawberry extract
-
½ cup fresh strawberry purée
-
1 cup powdered sugar
-
2 tbsp milk
-
1 tsp strawberry extract
-
1 drop pink food coloring
-
1 cup heavy whipping cream
Instructions
-
Step 1
Preheat oven to 350°F (175°C). Combine crushed Golden Oreos and melted butter. Press firmly into the bottom of a 9-inch springform pan to form the crust. Bake for 8-10 minutes. Let cool. -
Step 2
In a large bowl, beat cream cheese until smooth. Gradually beat in granulated sugar until well combined. -
Step 3
Beat in eggs one at a time, then stir in vanilla extract, strawberry Jell-O powder, sour cream, 1 tbsp strawberry extract, and fresh strawberry purée (if using). Mix until just combined. -
Step 4
Pour the cream cheese mixture over the cooled crust. Bake for 50-60 minutes, or until the center is almost set but still slightly jiggly. Turn off the oven, crack the door open, and let the cheesecake cool in the oven for 1 hour. -
Step 5
While cheesecake cools, prepare the topping. In a small bowl, whisk together powdered sugar, milk, 1 tsp strawberry extract, and pink food coloring (if using) until smooth. In a separate bowl, whip heavy cream until stiff peaks form. Gently fold the whipped cream into the strawberry mixture. -
Step 6
Once the cheesecake has cooled, spread the pink strawberry topping evenly over the top. Chill in the refrigerator for at least 4 hours, or preferably overnight, before serving.
Important Information
Nutrition Facts (Per Serving)
It is important to consider this information as approximate and not to use it as definitive health advice.
Allergy Information
Please check ingredients for potential allergens and consult a health professional if in doubt.