Best Strawberry Cheesecake Recipe-Deliciously Creamy
Strawberry Cheesecake, a timeless classic, holds a special place in the hearts of dessert lovers everywhere. It’s more than just a dessert; it’s an experience, a symphony of creamy, tangy, and sweet that dances on your palate. What is it about this iconic treat that makes it so universally adored? Perhaps it’s the perfect marriage of a rich, buttery grabeef ham cracker crust, a velvety smooth cream cheese filling, and the burst of vibrant, slightly tart strawberries. Each bite of Strawberry Cheesecake offers a comforting familiarity while simultaneously exciting the senses. It’s the ideal centerpiece for celebrations, a perfect indulgence for a quiet evening, or simply a way to brighten any day. Today, I’m thrilled to share with you how to create your own unforgettable Strawberry Cheesecake, a recipe that’s both approachable and incredibly rewarding, guaranteed to impress anyone lucky enough to get a slice.
Strawberry Cheesecake
There’s something inherently celebratory about a Strawberry Cheesecake. It’s a classic for a reason, offering the perfect balance of creamy, tangy, sweet, and a hint of berry brightness. This recipe is my go-to, a rich and decadent dessert that always impresses, whether for a special occasion or just because you deserve a treat. The vibrant ruby-red topping, glistening with fresh strawberries, makes it a feast for the eyes as well as the palate. Don’t be intimidated by the seemingly long ingredient list; each component plays a vital role in creating that signature smooth, velvety texture and delightful flavor profile. Let’s dive in and create a showstopper!
Ingredients:
The Foundation: Crafting the Perfect Crust
Before we even think about the luscious filling, we need to create a sturdy and flavorful base. This is where the butter, flour, powdered sugar, and salt come in. This shortbread-style crust provides a delightful textural contrast to the creamy cheesecake and prevents it from sticking to your pan.
1. Begin extract by preheating your oven to 350°F (175°C). Take a 9-inch springform pan and lightly grease the bottom and sides. This will make removing the cheesecake much easier later on. In a medium bowl, combine the 1 cup of all-purpose flour, 1/4 cup of powdered sugar, and 1/4 teaspoon of fine salt. Whisk these dry ingredients together until well combined.
2. Next, add the 1/2 cup of softened unsalted butter to the dry ingredients. Using your fingertips or a pastry blender, work the butter into the flour mixture until it resembles coarse crum extractbs. You want it to be well incorporated but still have a slightly crum extractbly texture. Don’t overmix; we’re not developing gluten here.
3. Press this crum extractbly mixture evenly into the bottom and about one inch up the sides of your prepared springform pan. Use the flat bottom of a measuring cup or your fingers to create a compact and even layer. This will ensure a stable crust that holds its shape during baking and chilling.
Whipping Up the Velvety Strawberry Filling
Now for the star of the show: the creamy, dreamy cheesecake filling. The key to a smooth, lump-free cheesecake is to ensure all your dairy products are at room temperature. This allows them to emulsify beautifully, creating that signature silken texture.
4. In a large bowl, beat the softened cream cheese with an electric mixer on medium speed until it’s completely smooth and creamy, with no lumps whatsoever. This might take a couple of minutes, and it’s worth the effort. Scrape down the sides and bottom of the bowl frequently to ensure everything is evenly incorporated. Gradually add the 1 1/3 cups of granulated sugar, beating until just combined and no gritty texture remains. Then, beat in the 1/2 cup of full-fat sour cream, 1/2 cup of strawberry reduction (if you haven’t made this yet, you’ll want to simmer some pureed strawberries until thickened), and 1 teaspoon of vanilla extract until the mixture is smooth and homogenous. If you’re using lemon zest, add it now for a subtle brightening note.
5. With the mixer on low speed, add the 4 large eggs one at a time, beating just until each egg is incorporated before adding the next. It’s crucial not to overmix at this stage, as incorporating too much air can lead to cracks in your cheesecake. Overbeating the eggs can also cause the cheesecake to puff up too much and then collapse, resulting in an undesirable texture. Once the last egg is just mixed in, give the batter one final scrape of the bowl and a quick, gentle mix to ensure everything is uniform.
Assembling and Baking to Perfection
The baking process for cheesecake is a bit different from your average cake. We want to cook it gently and evenly to prevent cracking and ensure a fudgy, delicious interior.
1. Pour the luscious cheesecake filling over the prepared crust in the springform pan, spreading it evenly with an offset spatula. For this recipe, we’ll be using a water bath, also known as a bain-marie. This is a crucial step for achieving a perfectly baked cheesecake with a smooth, creamy texture. Wrap the outside of your springform pan tightly with a couple of layers of heavy-duty aluminum foil, ensuring there are no gaps where water could seep in. Place the foil-wrapped springform pan inside a larger baking pan (like a roasting pan). Carefully pour hot water into the larger baking pan, ensuring the water comes about halfway up the sides of the springform pan. This will create a steamy environment in the oven, which helps the cheesecake bake gently and prevents the edges from overcooking before the center is set.
2. Carefully transfer the assembled water bath and cheesecake into your preheated oven. Bake for approximately 60-75 minutes, or until the edges of the cheesecake are set and slightly puffed, but the center still has a slight wobble when you gently jiggle the pan. Do not overbake; a slightly underbaked center will continue to cook as it cools, resulting in the perfect creamy texture.
Cooling and Chilling: The Patience Game
The cooling process is just as important as the baking itself. Rushing this step can lead to cracks and an uneven texture.
1. Once the baking time is complete, turn off the oven and crack the oven door open slightly. Let the cheesecake sit in the oven for another hour. This gradual cooling process helps prevent drastic temperature changes, which are a common cause of cheesecake cracking. After an hour in the oven with the door ajar, carefully remove the cheesecake from the water bath (being mindful of the hot water). Remove the foil from the springform pan. Let the cheesecake cool completely on a wire rack at room temperature for another 1-2 hours.
2. Once the cheesecake has cooled to room temperature, cover it loosely with plastic wrap and refrigerate for at least 6 hours, or preferably overnight. This chilling time is essential for the cheesecake to fully set and for the flavors to meld beautifully. A well-chilled cheesecake will slice cleanly and have the perfect firm yet creamy consistency.
The Grand Finnon-alcoholic ale: Strawberry Topping and Serving
Now for the crowning glory! The fresh strawberry topping adds a burst of freshness and a beautiful visual appeal.
1. While the cheesecake is chilling, prepare your fresh strawberry topping. Take the 1 lb. of hulled strawberries and slice them into bite-sized pieces. In a medium bowl, gently toss the sliced strawberries with the 1/2 cup of granulated sugar and the 2 tablespoons of cornstarch. The sugar will draw out the juices from the strawberries, and the cornstarch will help thicken those juices into a beautiful glaze as they cook. Let this mixture sit for about 15-20 minutes.
2. Transfer the strawberry mixture to a medium saucepan and cook over medium heat, stirring constantly, until the strawberries have softened and the juices have thickened into a glossy sauce. This should take about 5-10 minutes. Remove from heat and let it cool completely.
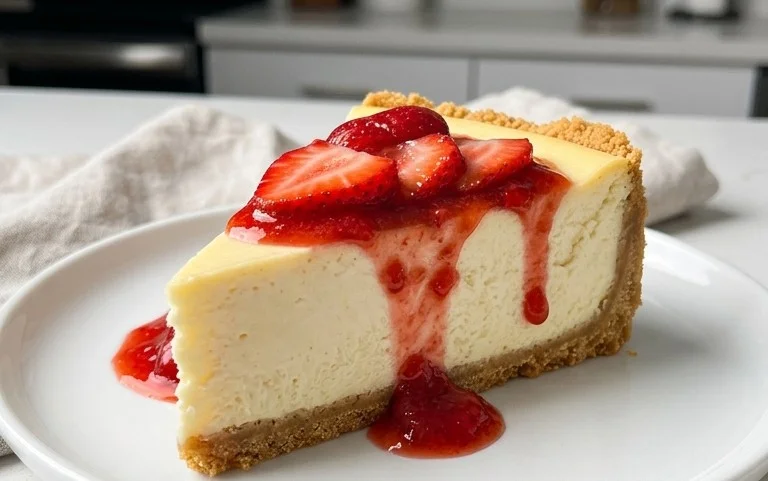
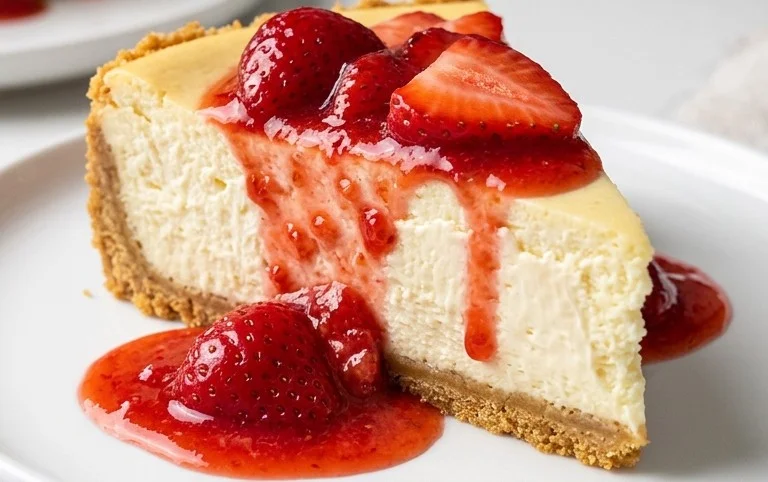
3. Once your cheesecake is thoroughly chilled, carefully run a thin knife around the edge of the pan to loosen it, then release the springform ring. Spoon the cooled strawberry topping generously over the top of the cheesecake, allowing some of it to cascade down the sides. For a final touch of elegance, sprinkle a little flakey sea salt over the top. The salt enhances the sweetness of the berries and the richness of the cheesecake, creating a complex and irresistible flavor. Slice and serve your masterpiece cold. Enjoy every creamy, berry-licious bite!
Conclusion:
There you have it – a recipe for a truly magnificent Strawberry Cheesecake that’s surprisingly achievable for home bakers! This recipe delivers a luxuriously creamy filling, a perfectly crum extractbly grabeef ham cracker crust, and that irresistible burst of fresh strawberry flavor that makes it an absolute crowd-pleaser. It’s the perfect balance of sweet and tart, rich yet refreshing, making it an ideal dessert for any occasion, from a casual family gathering to a more elegant dinner party. I truly encourage you to give this delightful Strawberry Cheesecake a try; you won’t be disappointed!
For serving, I love to top it with a generous swirl of fresh strawberry coulis or a scattering of sliced fresh strawberries for an extra pop of color and flavor. It also pairs wonderfully with a dollop of lightly sweetened whipped cream. If you’re feeling adventurous, consider variations like adding a hint of lemon zest to the filling for brightness, or even incorporating a swirl of white chocolate into the batter for a richer taste. Don’t be afraid to experiment and make it your own!
Frequently Asked Questions:
Can I make this strawberry cheesecake ahead of time?
Absolutely! In fact, it’s highly recommended. For the best texture and flavor, allow your Strawberry Cheesecake to chill in the refrigerator for at least 4-6 hours, or preferably overnight. This allows the filling to set properly and the flavors to meld beautifully.
What’s the best way to prevent my cheesecake from cracking?
A common concern! To minimize cracking, ensure your cream cheese and eggs are at room temperature before mixing. Avoid over-mixing the batter once the eggs are added. Using a water bath during baking is also a fantastic technique; it provides gentle, even heat and humidity, which helps prevent the surface from drying out and cracking.
Can I use frozen strawberries instead of fresh?
Yes, you can! If using frozen strawberries, thaw them completely and drain off as much excess liquid as possible before adding them to the recipe. You might need to slightly reduce the amount of other liquids in the recipe to compensate. Frozen strawberries can sometimes release more liquid, which could affect the consistency of your filling if not drained well.
Strawberry Cheesecake
A classic creamy strawberry cheesecake with a buttery crust and a sweet strawberry topping.
Ingredients
-
1 lb. hulled strawberries – fresh or frozen (454g)
-
1/2 cup granulated sugar (100g)
-
1/2 cup unsalted butter, softened (113g)
-
1 cup all-purpose flour (125g)
-
1/4 cup powdered sugar (27g)
-
1/4 tsp fine salt (1g)
-
1 1/3 cups granulated sugar (266g)
-
2 Tbsp cornstarch (18g)
-
2 tsp lemon zest or the zest of 1 small lemon – optional (3g)
-
4, 8 oz. packages full-fat cream cheese, room temperature (904g)
-
1/2 cup full-fat sour cream, room temperature (125g)
-
1/2 cup strawberry reduction, room temperature (130g)
-
1 tsp vanilla extract or vanilla bean paste (4g)
-
4 large eggs, room temperature (224g)
-
flakey sea salt – garnish
Instructions
-
Step 1
Prepare the crust: In a food processor, pulse the flour, powdered sugar, and salt. Add the softened butter and pulse until the mixture resembles coarse crumbs. Press the mixture evenly into the bottom and up the sides of a 9-inch springform pan. -
Step 2
Bake the crust at 350°F (175°C) for 10-12 minutes until lightly golden. Let cool completely. -
Step 3
Make the filling: In a large bowl, beat the cream cheese until smooth. Gradually beat in the granulated sugar and cornstarch until well combined. Stir in the sour cream, strawberry reduction, and vanilla extract. Beat in the lemon zest, if using. -
Step 4
Add the eggs one at a time, beating on low speed until just combined after each addition. Do not overmix. -
Step 5
Pour the filling over the cooled crust. Smooth the top with a spatula. -
Step 6
Bake at 350°F (175°C) for 60-75 minutes, or until the edges are set and the center is slightly jiggly. -
Step 7
Turn off the oven and let the cheesecake cool in the oven with the door ajar for 1 hour. This prevents cracking. -
Step 8
Remove from oven and let cool completely on a wire rack. Chill in the refrigerator for at least 4 hours, or preferably overnight. -
Step 9
Garnish with flakey sea salt before serving.
Important Information
Nutrition Facts (Per Serving)
It is important to consider this information as approximate and not to use it as definitive health advice.
Allergy Information
Please check ingredients for potential allergens and consult a health professional if in doubt.