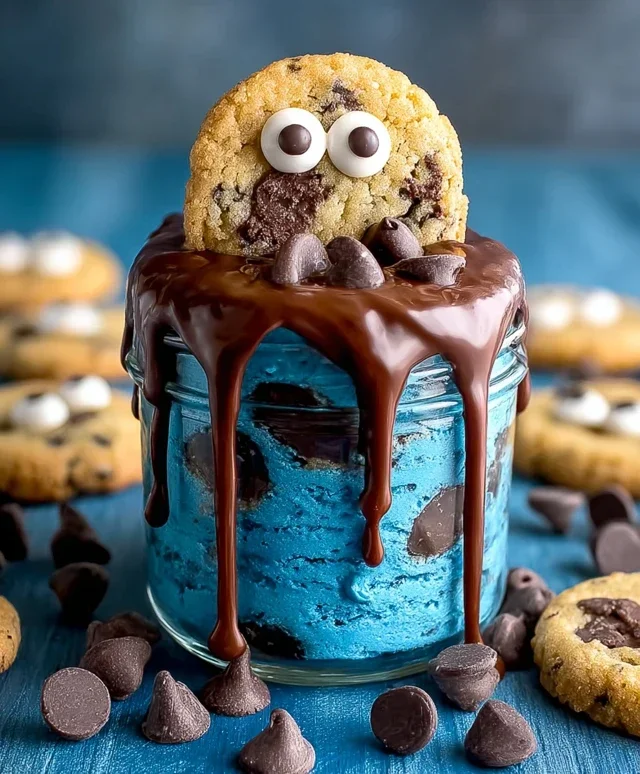
Cookie Monster Cake Jars – Fun & Easy Dessert
Cookie Monster Cake Jars are the whimsical, delicious treat you never knew you needed, but absolutely will after one bite! Who can resist that iconic blue hue and the unmistakable crunch of cookies mixed into a fluffy cake? These aren’t just any dessert; they’re a nostalgic trip back to childhood, a vibrant explosion of flavor and fun packed into adorable, portable jars. We love them because they capture the playful spirit of our favorite blue monster, transforming his cookie obsession into a delightful edible masterpiece. What makes our Cookie Monster Cake Jars so special is the perfect balance of sweet, creamy frosting, moist cake, and delightfully chunky cookie pieces, all layered artfully to create a visual and gustatory sensation. Get ready to dive into a jar of pure joy!

Cookie Monster Cake Jars
Get ready to unleash your inner Cookie Monster with these incredibly fun and delicious cake jars! These individual treats are perfect for parties, as unique gifts, or just for satisfying a serious craving. We’re transforming a simple cake mix into a vibrant, blue-hued masterpiece, layered with crushed Oreos and a creamy, dreamy frosting. Don’t worry if you’re not a master baker; these jars are all about fun and flavor, and they’re surprisingly easy to assemble. Let’s get baking and layering!
Ingredients:
Baking the Cake
The first step to our Cookie Monster cake jars is to bake the cake. Follow the instructions on your 15 oz box of white or vanilla cake mix precisely. You’ll typically need to add eggs, oil, and water. Preheat your oven and prepare your baking pan(s) as directed. I usually opt for a 9×13 inch baking pan as it’s easy to get a nice, even layer of cake that’s perfect for crum extractbling. Ensure your ingredients are at the right temperature as specified on the box. Once baked, let the cake cool completely in the pan before attempting to remove it. This is crucial for easy handling and preventing it from falling apart.
Preparing the Cake Crum extractbles
Once your cake has cooled entirely, it’s time to turn it into delightful cake crum extractbles. Gently remove the cake from the pan and place it on a clean surface or a large baking sheet. Using your hands or a fork, break the cake into smaller pieces. Then, we’ll process these pieces into crum extractbles. You can do this in batches using a food processor, pulsing until you have a consistency that resembles coarse breadcrum extractbs. Alternatively, if you don’t have a food processor, you can place the cake pieces in a large zip-top bag and gently crush them with a rolling pin or the bottom of a heavy glass. Aim for a mix of fine crum extractbs and slightly larger pieces for texture. This crum extractbled cake will form the base and layers of our jars.
Whipping Up the Cookie Monster Frosting
Now for the star of the show – the vibrant blue Cookie Monster frosting! In a large mixing bowl, cream together the softened unsalted butter and vegetable shortening until light and fluffy. This is best done with an electric mixer. Gradually add the powdered sugar, about a cup at a time, mixing on low speed until incorporated, then increasing the speed. Once all the powdered sugar is added and the mixture is smooth, add the milk or coffee creamer, starting with 2 tablespoons. You want a thick but spreadable consistency; add the third tablespoon only if needed. Stir in the vanilla extract.
Now for the fun part: coloring! Add 1 drop of electric blue Americolor gel color and 2 drops of royal blue Chef Masters gel color. Gel colors are highly concentrated, so start with these small amounts and mix thoroughly. You can always add more color to achieve your desired shade of Cookie Monster blue. Mix until the color is completely uniform and vibrant. Be patient; it might take a little mixing to get that perfect, playful hue. Taste the frosting – if it’s too sweet for your liking, you can add a tiny pinch of salt to balance it out, though usually the sweetness is part of the charm!
Assembling the Cake Jars
This is where the magic happens! Grab your clean jars (about 8-10 ounce canning jars work perfectly). Start by spooning a layer of your crum extractbled cake into the bottom of each jar. Don’t overfill; leave plenty of room for frosting and other yummy additions. Next, add a generous dollop of your Cookie Monster frosting, spreading it evenly over the cake crum extractbles. Then, sprinkle a layer of your chopped Oreos (from the divided amount) and chopped chocolate chip cookies over the frosting. Repeat the layering process: another layer of cake crum extractbles, followed by more frosting, and then a sprinkle of your mixed cookie crum extractbles. Continue layering until your jars are nearly full, leaving about an inch of space at the top for a final flourish.
Adding the Finishing Touches
To truly bring our Cookie Monster cake jars to life, we need to add those iconic details. On top of your final frosting layer, add a few more chopped Oreos and chocolate chip cookies. Now, carefully place two candy eyes onto the frosting to create Cookie Monster’s signature goofy eyes. For an extra special touch, you can strategically place one of the chocolate chip cookie halves on top, as if Cookie Monster is about to gobble it up! If you’re making these for a party or as gifts, tie a festive blue ribbon around the rim of each jar for an extra decorative element. These jars are best enjoyed within a few days and should be stored in the refrigerator to keep the frosting firm. Enjoy your delightful, edible creations!
Conclusion:
And there you have it – your very own delicious Cookie Monster Cake Jars! This recipe is an absolute winner because it’s not only incredibly fun and visually appealing with its vibrant blue hues and cookie crum extractbles, but it’s also remarkably simple to put together. Perfect for parties, bake snon-alcoholic ales, or just a delightful treat for yourself, these cake jars deliver big on flavor and fun with minimal fuss. The individual portions make them ideal for easy serving and portion control, and they’re a fantastic way to use up any leftover cake or frosting. I highly encourage you to give this Cookie Monster Cake Jars recipe a try; you won’t be disappointed by the smiles it brings!
For serving suggestions, these jars are fantastic as is, directly from the fridge. They also make adorable party favors when topped with a small cookie or a sprinkle of edible glitter. If you’re looking for variations, consider swapping the blue food coloring for other fun shades, or incorporating different cookie types like chocolate chip or Oreos into the layers. You could also add a layer of cheesecake filling for an extra decadent touch. The possibilities are truly endless!
Frequently Asked Questions about Cookie Monster Cake Jars:
Q1: Can I make the cake and frosting ahead of time?
Absolutely! You can bake your cake and prepare your frosting a day or two in advance. Store the cake at room temperature, loosely covered, and the frosting in an airtight container in the refrigerator. Just before assembling, let the frosting come to room temperature and whip it briefly to ensure a smooth consistency. This makes assembling the jars even quicker!
Q2: How long do Cookie Monster Cake Jars last?
When stored properly in airtight jars in the refrigerator, these cake jars will typically stay fresh and delicious for about 3 to 4 days. They are best enjoyed within the first couple of days to savor the texture of the cake and frosting.
Cookie Monster Cake Jars
Fun and delicious Cookie Monster-themed cake jars layered with blue cake, cookies, and creamy frosting.
Ingredients
-
15 oz box white or vanilla cake mix
-
Ingredients called for on cake mix box (typically eggs, oil, and water)
-
10 Oreos, chopped (divided)
-
½ cup (1 stick) unsalted butter, room temperature
-
½ cup vegetable shortening
-
3 cups powdered sugar
-
2-3 tablespoons milk or coffee creamer
-
1 teaspoon vanilla extract
-
1 drop electric blue Americolor gel color
-
2 drops royal blue Chef Masters gel color
-
8-10 Oreos, chopped
-
8-10 chocolate chip cookies, chopped
-
8 candy eyes
-
2 chocolate chip cookies, cut in half
-
Blue ribbon (optional, for decorating jars)
Instructions
-
Step 1
Prepare the cake mix according to package directions, adding the specified eggs, oil, and water. Divide batter evenly among jars, filling each about 2/3 full. Bake according to cake mix instructions or until a toothpick inserted comes out clean. Let cool completely. -
Step 2
To make the frosting, cream together butter and shortening. Gradually add powdered sugar, alternating with milk or coffee creamer, until smooth and creamy. Stir in vanilla extract. -
Step 3
Divide frosting into two bowls. Tint one bowl with electric blue Americolor gel and the other with royal blue Chef Masters gel. Stir well to combine. -
Step 4
Assemble the jars by layering crumbled cake, chopped Oreos, chopped chocolate chip cookies, and dollops of blue frosting. Repeat layers until jars are full, finishing with a layer of frosting. -
Step 5
Decorate the top of each jar to resemble Cookie Monster’s face. Use candy eyes and place them on top. Add a few chocolate chip cookie halves as accent. Optionally, tie a blue ribbon around the jars.
Important Information
Nutrition Facts (Per Serving)
It is important to consider this information as approximate and not to use it as definitive health advice.
Allergy Information
Please check ingredients for potential allergens and consult a health professional if in doubt.