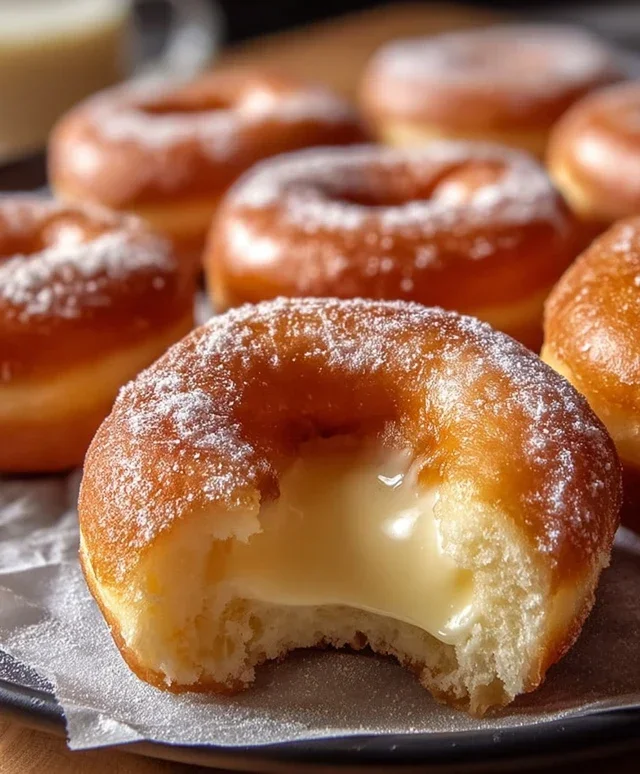
Milky Cheese Donuts – Irresistible Baked Treat
Milky Cheese Donuts are the ultimate comfort food, a delightful fusion that will have you reaching for one (or maybe two!) the moment you catch a whiff. Imagin extracte biting into a cloud-like, slightly sweet donut, only to discover a warm, gooey, savory cheese center. It’s that unexpected contrast, that magical interplay of sweet and salty, that makes these Milky Cheese Donuts so utterly irresistible. We love them because they’re a playful twist on traditional donuts, offering a sophisticated yet incredibly satisfying flavor profile that appeals to both sweet and savory cravings. These aren’t just any donuts; they’re a revelation. What truly makes them special is the delicate balance achieved between the airy, milky dough and the rich, melty cheese, creating a textural and gustatory experience unlike any other. Get ready to fall in love with this unique treat!
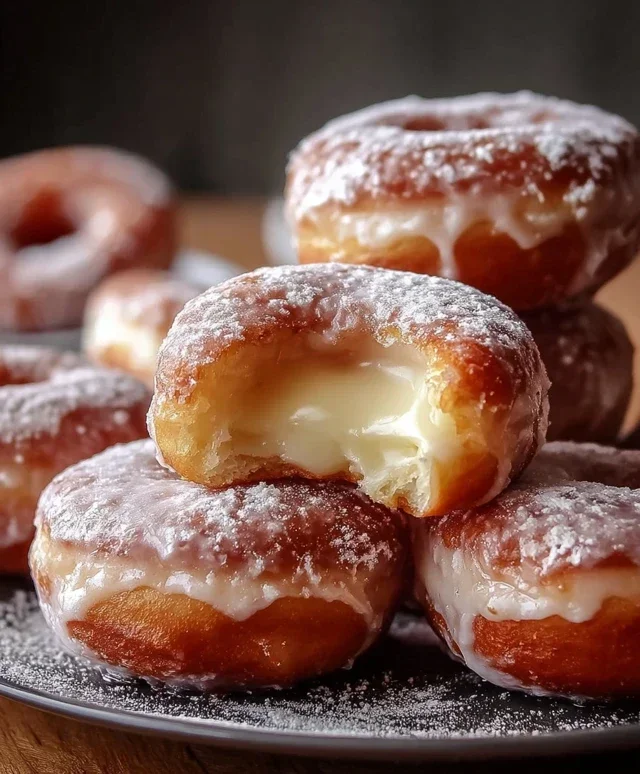
Milky Cheese Donuts
Get ready for a delightful treat that’s a little bit sweet, a little bit savory, and a whole lot of delicious. These Milky Cheese Donuts are a unique twist on a classic, perfect for breakfast, a snack, or even a light dessert. The combination of a soft, milky dough with the subtle, melty goodness of mozzarella cheese is surprisingly addictive. I love making these when I want something a little different, and they always disappear quickly! Let’s get started on creating these amazing donuts.
Ingredients:
Preparing the Dough
The foundation of any great donut is the dough, and ours is no exception. We’re going for a soft, slightly enriched dough that will fry up beautifully.
1. First, let’s get our yeast activated. In a small bowl or the bowl of your stand mixer, combine the warm whole milk (make sure it’s not too hot, or it will kill the yeast, and not too cool, or it won’t activate), the 2 tablespoons of sugar, and the active dry yeast. Give it a gentle stir and let it sit for about 5-10 minutes. You should see it become foamy and bubbly, which is a sign that your yeast is alive and ready to work its magic. If it doesn’t foam, your yeast might be old, and you’ll need to start with a fresh packet.
2. Once the yeast mixture is foamy, add in the ½ teaspoon of salt and the 1 large egg. If you’re using a stand mixer, attach the dough hook. Gradually add the 2 cups of all-purpose flour, mixing on low speed until a shaggy dough forms. Then, slowly drizzle in the 4 tablespoons of melted unsalted butter. Continue mixing until the dough starts to pull away from the sides of the bowl and becomes smooth and elastic. This process might take about 5-7 minutes in a stand mixer, or about 8-10 minutes if you’re doing it by hand on a lightly floured surface. The dough should be slightly sticky but manageable.
First Rise and Incorporating the Cheese
Now it’s time for the dough to develop its wonderful texture.
3. Lightly grease a clean bowl with a little oil. Place the dough in the greased bowl, turning it once to coat the entire surface. Cover the bowl tightly with plastic wrap or a clean kitchen towel and let it rise in a warm place for about 1 to 1.5 hours, or until it has doubled in size. A slightly warm oven (turned off!) is a great spot for this. Once the dough has doubled, gently punch it down to release the air. Now, here’s where the magic happens for our cheese donuts. Sprinkle the 1 cup of shredded mozzarella cheese over the deflated dough. Gently knead the dough for a minute or two to evenly distribute the cheese throughout. It might feel a little more resistant now, but keep working it until the cheese is incorporated. Don’t worry if it’s not perfectly uniform; pockets of cheese are delicious!
Shaping and Second Rise
The donuts are starting to take shape!
4. Turn the dough out onto a lightly floured surface. You can either roll the dough to about ½-inch thickness and cut out donut shapes using a donut cutter or two round cookie cutters (one larger for the outer circle, one smaller for the center hole), or you can simply form small balls of dough for donut holes. Arrange the shaped donuts or donut holes on a baking sheet lined with parchment paper, leaving some space between them. Cover them loosely with plastic wrap or a clean kitchen towel and let them rise again for another 30-45 minutes. They will puff up and become noticeably larger. This second rise is crucial for achieving a light and airy donut.
Frying to Golden Perfection
The most exciting part – transforming the dough into delicious donuts!
5. Now it’s time to fry! Pour enough vegetable or canola oil into a deep, heavy-bottomed pot or Dutch oven to reach a depth of about 2-3 inches. Heat the oil over medium heat to 350-375°F (175-190°C). It’s important to maintain this temperature; too low and your donuts will be greasy, too high and they will burn before cooking through. You can test the oil temperature by dropping a tiny piece of dough into it; it should sizzle immediately and float to the top. Carefully place 2-3 donuts into the hot oil at a time, being careful not to overcrowd the pot, as this will lower the oil temperature. Fry them for about 1-2 minutes per side, until they are a beautiful golden brown. Use a slotted spoon or spider strainer to carefully remove them from the oil and place them on a wire rack set over a baking sheet to drain any excess oil.
Finishing Touches
The final, delightful step!
If you like, while the donuts are still warm, you can dust them generously with powdered sugar. The warmth of the donut will help the sugar adhere beautifully. Serve these Milky Cheese Donuts warm for the best experience. You’ll love the subtle chew of the dough, the hint of sweetness, and the delightful pockets of melted mozzarella. Enjoy every bite of these unique and satisfying treats!
Conclusion:
And there you have it – a delightful journey into crafting your own incredibly moreish Milky Cheese Donuts! This recipe is truly a winner because it strikes the perfect balance between a subtly sweet, tender donut and a savory, cheesy filling that’s simply irresistible. The combination is unexpected yet wonderfully harmonious, making these a standout treat for any occasion. Whether you’re looking for a unique breakfast option, a delightful afternoon snack, or even a conversation-starting appetizer, these Milky Cheese Donuts are sure to impress.
For serving, I love them warm, fresh from the fryer or oven, perhaps dusted with a touch of powdered sugar for a visual contrast and an extra hint of sweetness. They are also fantastic alongside a cup of coffee or tea. If you’re feeling adventurous, consider adding a pinch of chili flakes to your cheese filling for a spicy kick, or try incorporating different herbs like chives or parsley. Don’t be afraid to experiment and make these your own!
I genuinely encourage you to give this recipe a try. It’s more straightforward than you might think, and the reward of biting into a perfectly cooked, cheesy donut is absolutely worth it. Happy baking and indulgin extractg!
Frequently Asked Questions:
Can I make these ahead of time?
While Milky Cheese Donuts are best enjoyed fresh, you can prepare the dough and filling a day in advance. Store the dough in the refrigerator and the filling separately. For the best texture, fry or bake them just before serving.
What kind of cheese works best?
A blend of mild cheddar and mozzarella works wonderfully for a creamy, melty center. You can also experiment with Gruyere for a nuttier flavor, or even a touch of Parmesan for added saltiness. Just ensure your cheese melts well.
Can I bake these instead of frying them?
Absolutely! Baking is a great alternative if you prefer a lighter option. Brush the formed donuts with a little melted butter or egg wash before baking at around 375°F (190°C) until golden brown and cooked through. They won’t have the exact same crispy exterior as fried donuts, but they will still be delicious!
Milky Cheese Donuts
Deliciously soft and slightly savory donuts made with milk and cheese, perfect for a unique breakfast or snack.
Ingredients
-
2 cups all-purpose flour
-
1 cup whole milk, warm (about 110°F)
-
2 tablespoons sugar
-
2¼ teaspoons active dry yeast (1 packet)
-
½ teaspoon salt
-
1 large egg
-
4 tablespoons unsalted butter, melted
-
1 cup shredded mozzarella cheese
-
Vegetable or canola oil, for frying
-
Powdered sugar, for dusting (optional)
Instructions
-
Step 1
In a large bowl, combine the warm milk, sugar, and active dry yeast. Let it sit for about 5-10 minutes until foamy. -
Step 2
Add the egg, melted butter, salt, and shredded mozzarella cheese to the yeast mixture. Stir to combine. -
Step 3
Gradually add the all-purpose flour, mixing until a soft dough forms. Knead the dough on a lightly floured surface for 5-7 minutes until smooth and elastic. -
Step 4
Place the dough in a greased bowl, cover, and let it rise in a warm place for 1-1.5 hours, or until doubled in size. -
Step 5
Punch down the dough and roll it out to about ½ inch thickness. Cut out donut shapes using a donut cutter or two different sized round cutters. -
Step 6
Let the cut donuts rise again on a parchment-lined baking sheet for about 20-30 minutes. -
Step 7
Heat vegetable or canola oil in a deep pot or Dutch oven to 350°F (175°C). Carefully fry the donuts, a few at a time, for 1-2 minutes per side, until golden brown. -
Step 8
Remove the donuts from the oil and drain on paper towels. Dust with powdered sugar while still warm, if desired.
Important Information
Nutrition Facts (Per Serving)
It is important to consider this information as approximate and not to use it as definitive health advice.
Allergy Information
Please check ingredients for potential allergens and consult a health professional if in doubt.