Sticky Coconut Cake- Irresistible Tropical Treat
Sticky Coconut Cake is more than just a dessert; it’s a warm embrace, a tropical vacation for your taste buds, and a guaranteed crowd-pleaser. If you’re looking for a cake that’s both incredibly moist and bursting with flavor, then this Sticky Coconut Cake recipe is your golden ticket. What is it about this delightful confection that captures hearts so easily? It’s that perfect harmony of tender, fluffy cake generously infused with the sweet, nutty essence of coconut, all elevated by a lusciously gooey, caramelized topping. Each bite is a symphony of textures and tastes – the soft crum extractb yielding to the sticky glaze, creating an unforgettable experience. We all crave those comforting, yet sophisticated bakes, and this one truly delivers. It’s the kind of cake that makes you close your eyes in pure bliss and leaves everyone asking for seconds (and the recipe!).
Sticky Coconut Cake
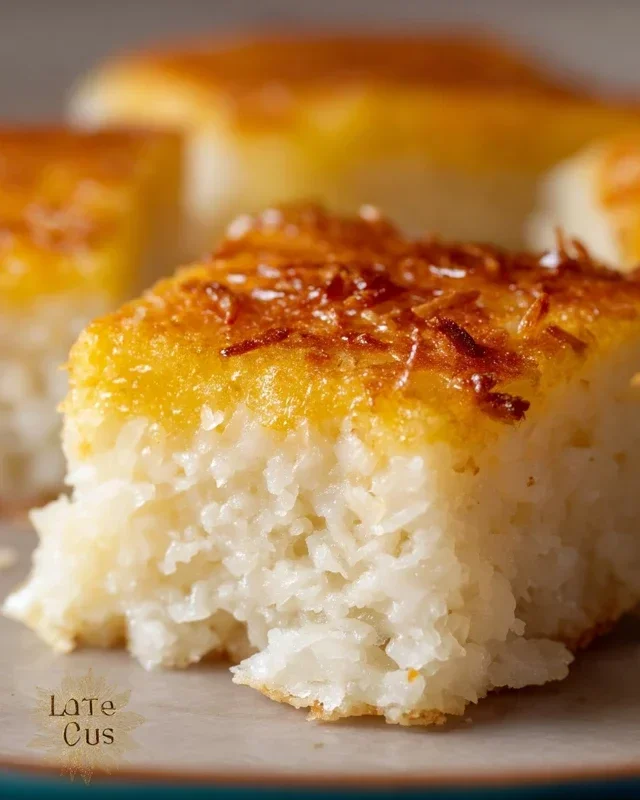
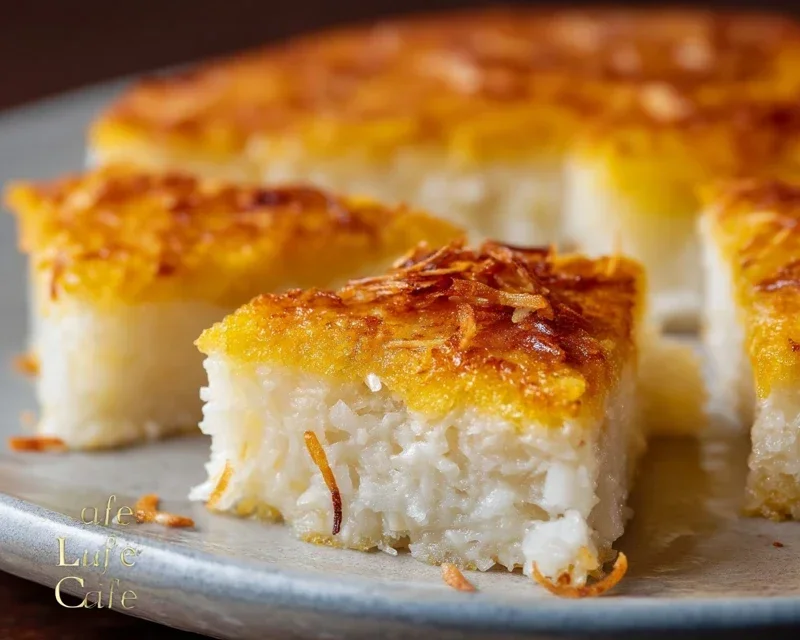
This Sticky Coconut Cake is an absolute delight for anyone who loves the rich, tropical flavour of coconut. It’s incredibly moist, wonderfully chewy, and boasts a subtle sweetness that makes it perfect for any occasion. Forget your average cake; this is a dense, flavour-packed treat that’s surprisingly easy to make. The magic happens with a few key ingredients, most notably the full-fat coconut milk and glutinous rice flour, which create that signature sticky, chewy texture that’s so addictive. I love how simple the ingredient list is, and the process itself is quite straightforward, making it a great recipe for bakers of all levels. Let’s dive into creating this little slice of tropical paradise.
Ingredients:
Preparing the Batter
The first step in creating our delicious Sticky Coconut Cake involves preparing the wet ingredients and combining them with the dry. This stage is crucial for ensuring a smooth, well-emulsified batter.
1. Start by preheating your oven to 350°F (175°C). This ensures your oven is at the correct temperature when the cake is ready to bake, leading to even cooking. Grease and flour a 9×13 inch baking pan. This step is essential to prevent the cake from sticking, ensuring a clean release after baking. You can also line the bottom with parchment paper for extra insurance. In a large bowl, whisk together the 2 egg yolks, 1¼ cup granulated sugar, and 1 teaspoon vanilla extract until the mixture is pnon-alcoholic ale yellow and slightly thickened. This process, often called creaming, incorporates air and helps to dissolve the sugar. Next, gradually whisk in the 2¼ cups full fat canned coconut milk until well combined. It’s important to use full-fat coconut milk here, as it provides the richness and moisture that is characteristic of this cake. Light or reduced-fat versions won’t yield the same decadent results.
2. Now it’s time to introduce the dry ingredients. In a separate bowl, whisk together the 1½ cup glutinous rice flour and the 3 cups shredded sweetened coconut. Glutinous rice flour, also known as sweet rice flour, is what gives this cake its wonderfully chewy and sticky texture. It’s different from regular rice flour or all-purpose flour. Ensure that your shredded coconut is sweetened; this contributes to the overall sweetness and moisture of the cake. Gradually add this dry mixture to the wet ingredients, whisking until just combined. Be careful not to overmix at this stage; overmixing can develop the gluten in the flour (even though it’s rice flour, there’s still a risk of toughness) and result in a less tender cake. The batter will be quite thick and sticky, which is exactly what we’re aiming for.
Baking the Cake
Once the batter is ready, it’s time to move on to the baking process. This is where the magic truly happens, transforming our sticky batter into a delightful cake.
3. In a clean, dry bowl, beat the 2 egg whites with an electric mixer on medium-high speed until stiff peaks form. You’ll know they’re ready when you can turn the bowl upside down and the egg whites stay put. This is a crucial step for adding a bit of lightness to the dense batter. Gently fold the beaten egg whites into the cake batter in two additions. Use a spatula and a folding motion – scooping from the bottom of the bowl up and over the egg whites – to incorporate them without deflating the air you’ve just whipped in. This folding technique ensures the egg whites are evenly distributed, contributing to a slightly airier, yet still wonderfully dense, cake.
4. Pour the batter evenly into your prepared baking pan. Use a spatula to spread it out smoothly, ensuring an even layer. The batter will be quite thick, so it may require a little encouragement to spread to the edges. Tap the pan gently on the counter a few times to help settle the batter and release any large air bubbles. Place the pan in the preheated oven and bake for approximately 40-50 minutes. The exact baking time can vary depending on your oven, so it’s important to keep an eye on it. You’ll know the cake is done when a toothpick inserted into the center comes out clean, or with just a few moist crum extractbs attached (not wet batter). The top should be golden brown and the edges should be pulling away slightly from the sides of the pan.
Cooling and Serving
The final steps involve letting the cake cool properly and then, the most enjoyable part, serving and savouring it.
5. Once baked, remove the Sticky Coconut Cake from the oven and let it cool in the pan on a wire rack for at least 15-20 minutes. This allows the cake to firm up and makes it easier to handle. Resist the urge to cut into it immediately; a hot cake is more prone to crum extractbling. After this initial cooling period, you can carefully invert the cake onto the wire rack to cool completely. Alternatively, you can cool it entirely in the pan. Once completely cooled, you can slice it into squares or rectangles. This cake is delicious served on its own, allowing the rich coconut flavour to shine. However, it’s also wonderful with a dollop of whipped cream, a scoop of vanilla ice cream, or a light dusting of powdered sugar. For an extra coconut kick, you could even sprinkle some toasted shredded coconut over the top. The texture is best enjoyed at room temperature, where the stickiness is most pronounced. Enjoy every wonderfully chewy, flavourful bite!
Conclusion:
I hope you’re as excited as I am to try this Sticky Coconut Cake! This recipe truly delivers a moist, tender crum extractb infused with the delightful tropical essence of coconut, all topped with an irresistible caramel-like glaze. It’s the perfect dessert for any occasion, from a casual afternoon treat to a celebratory gathering. The simplicity of the ingredients and steps means even novice bakers can achieve spectacular results, creating a cake that’s both comforting and a little bit exotic. Don’t be shy about diving in and experiencing this delightful flavour combination!
For serving, a dollop of whipped cream, a scoop of vanilla bean ice cream, or even a sprinkle of toasted coconut flakes will elevate this already wonderful cake. Consider adding a drizzle of extra caramel sauce if you’re feeling particularly indulgent. If you’re feeling adventurous, try adding a touch of lime zest to the batter for a brighter flavour profile, or perhaps some chopped macadamia nuts for added crunch.
I genuinely encourage you to give this Sticky Coconut Cake a go. It’s a recipe that’s sure to become a favourite in your baking repertoire.
Frequently Asked Questions:
Can I make this cake ahead of time?
Yes, absolutely! This Sticky Coconut Cake can be made a day in advance. Once cooled completely, store it in an airtight container at room temperature. The flavours often meld beautifully overnight, making it even more delicious the next day. Just be sure the glaze has set properly before covering.
How do I store leftover cake?
Store any leftover Sticky Coconut Cake in an airtight container at room temperature for up to 3 days. If your kitchen is particularly warm, or if you prefer it chilled, you can also store it in the refrigerator. Just allow it to come back to room temperature for the best texture and flavour before serving.
What kind of coconut should I use?
For this recipe, I recommend using shredded or desiccated sweetened coconut. This provides the best texture and sweetness that complements the sticky glaze. If you can only find unsweetened coconut, you may need to slightly increase the sugar in the cake batter to compensate for the lack of sweetness.
Sticky Coconut Cake
A sweet and moist cake made with coconut milk and glutinous rice flour, topped with toasted coconut for a delightful texture.
Ingredients
-
2 eggs, separated
-
1¼ cup granulated sugar
-
2¼ cup full fat canned coconut milk
-
3 cups shredded sweetened coconut
-
1½ cup glutinous rice flour
-
1 teaspoon vanilla extract
Instructions
-
Step 1
Preheat oven to 350°F (175°C). Grease and flour a 9×13 inch baking pan. -
Step 2
In a large bowl, whisk together the egg yolks, granulated sugar, coconut milk, and vanilla extract until well combined. -
Step 3
Gradually whisk in the glutinous rice flour until smooth. Stir in 2 cups of the shredded coconut. -
Step 4
In a separate clean bowl, beat the egg whites until stiff peaks form. Gently fold the beaten egg whites into the batter. -
Step 5
Pour the batter into the prepared baking pan and spread evenly. Sprinkle the remaining 1 cup of shredded coconut over the top. -
Step 6
Bake for 35-45 minutes, or until a toothpick inserted into the center comes out clean and the top is golden brown. -
Step 7
Let cool in the pan for at least 15 minutes before slicing and serving.
Important Information
Nutrition Facts (Per Serving)
It is important to consider this information as approximate and not to use it as definitive health advice.
Allergy Information
Please check ingredients for potential allergens and consult a health professional if in doubt.